Crisp colourful leaves on the ground. Bit knitted tops. Bowls of tomato soup and darker evenings watching box sets. Yes that pretty much sounds like Autumn. I love every season going and when the seasons change I often dream about what will happen in this season. Autumn to me is about comfort, appreciation and preparing for ‘come what may’. The colourful leaves followed by the crazy colourful fireworks have me lusting for this season a lot.
And as a baker with children with a sweet tooth I love experimenting with flavours and in Autumn I love gently spicing food with cinnamon, ginger and cardamom. The warm aroma makes me feel safe and snug.
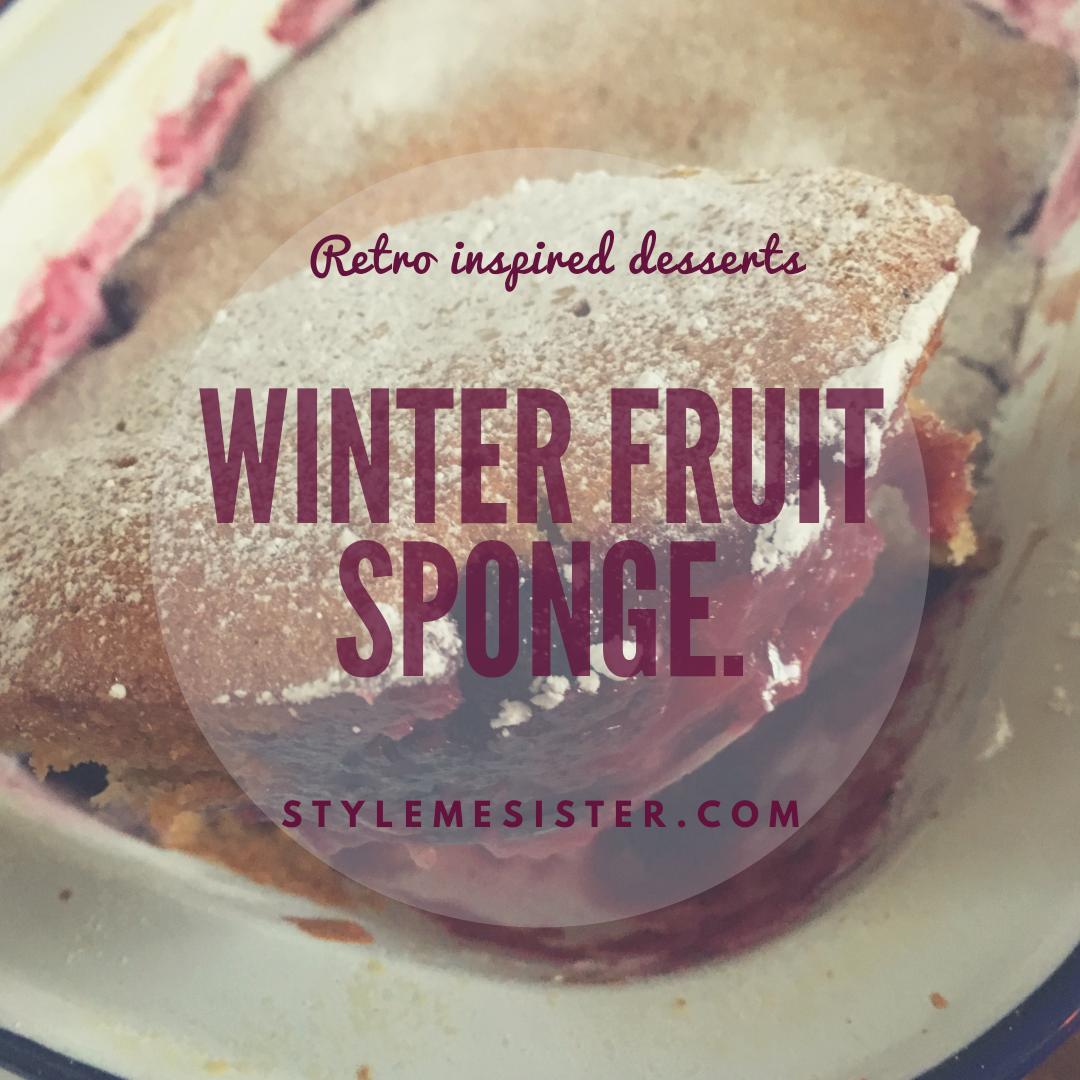
What says ‘hey it’s Autumn’ to me is the combination of apples and blackberries. So here I have an awesome recipe for winter fruit sponge. It’s not too sweet, not too tart and has a spongy warm layer that says Autumn has arrived.
Serve this beauty with lashings of custard….or if you are still pining for Summer a scoop of vanilla ice-cream!
Ingredients:
For the fruity layer
500 grams Apples, Blackberries & plums
175 ml water
60 grams sugar
1 small cinnamon stick
For the spongy top:
125 grams butter at room temperature
125 grams castor sugar
125 grams self raising flour
1 tsp ground cinnamon
1 tsp baking powder
1 egg whisked
50 ml milk
1) Place the apples, cinnamon and sugar in a pan and bring to the boil. Lower the heat and cook for 5 minutes.
2) Add the blackberries and cook for a further 2/3 minutes. Turn off the heat.
3) In a large bowl beat together the sugar and butter until creamed together. Add the egg and beat further.
4) Add the flour baking powder and ground ginger and beat. Don’t worry if it looks a bit lumpy that will be fixed later.
5) Now add the milk and stir in.
6) Take the baking tin and place the apple and blackberry in it. Spread evenly. Remove the cinnamon stick.
7) Pour over the sponge mix and spread evenly with a spatula.
8) Bake at 170 for 25 minutes (or until golden brown).
9) Take out of the oven and serve warm with custard.
10) Enjoy!
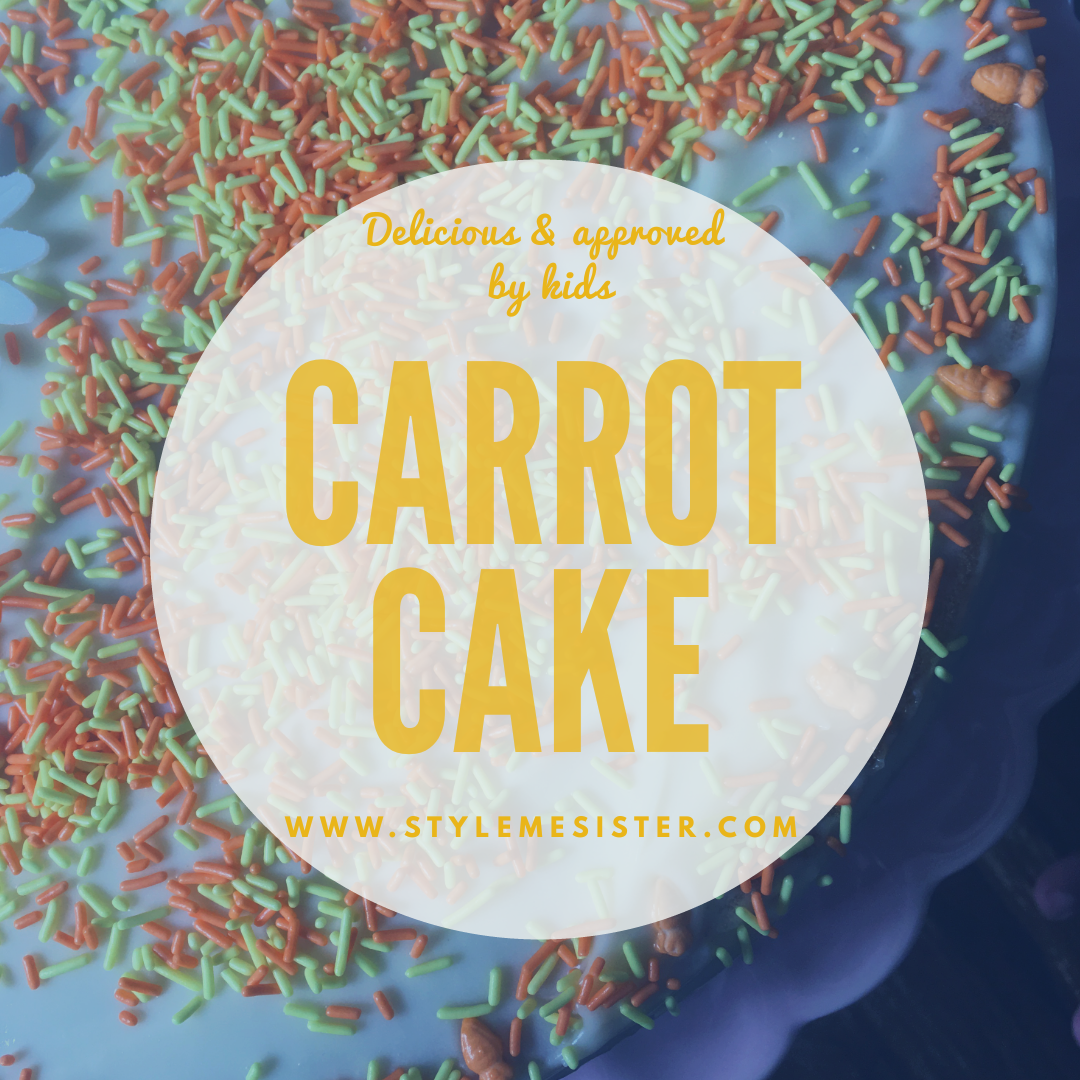
I have a soft spot for delectable carrot cake. When I was younger I used to heave at the idea of a vegetable in a cake. Actually I just disliked all vegetables as my parents lacked the kitchen skills of cooking vegetables without blitzing them into a ghastly grey mush.
So when I was older I discovered my love of cinnamon, orange and carrots combined in a carrot cake. The sweet yet spiciness from the cinnamon and the slight zesty taste from the orange married to carrots in a sponge had be at hello.
Over the years I’ve tried various recipes and I have to admit the best one I have found it the one I have below. I actually make the cake without raisins or nuts as my youngest loves carrot cake (she loves cinnamon) but cannot stand nuts or raisins. So rest assured that if you need to omit these ingredients this cake still tastes bloody awesome!
This cake also freezes well so I cut it into slices, wrap it into greaseproof paper and freeze it with the intention of using it up within 3 months. Don’t forget that leftover cake can also be used as a trifle base. So really there’s no reason for wastage here.
This cake is pretty easy to put together however I’ll warn you now; peeling and grating took me about 20 minutes. So if you have children who like carrot cake encourage them to help.
Ingredients:
Dry ingredients:
260 grams plain flour
2 tsp baking powder
1 tbsp ground cinnamon (less if you are not a friend of cinnamon)
1 tsp salt
Wet ingredients:
300 grams castor sugar
300 ml vegetable oil
4 medium eggs
Juice of one orange (& fine zest if you like citrus)
Fruit, nuts & Vegetables:
4 large carrots peeled and grated (or 6 medium carrots)
60 grams chopped up walnuts & a few ‘whole’ pieces to decorate the cake
60 grams raisins
Icing:
100 grams cream cheese
250 grams icing sugar
100 ml double cream
1 TBSP orange juice
1) Heat your oven to 170 c. Grease a 20 CM (8 inch) size round cake tin. I usually use Wiltons cake release as it it’s basically like greasing and flouring all in one but with no mess. You squirt a bit on the pan and brush it around. That’s optional; you can also use greaseproof paper to line your tin.
Note: you can use this recipe to make cupcakes. Fill large muffin tins up to 2/3 and bake for 20/25 minutes.
2) In a large bowl mix together the dry ingredients. Set to one side.
3) In another large bowl (the bigger the better trust me on this!) mix together the oil and sugar. Add the eggs, a bit at a time (you can add one at a time to make it easier for you). Beat together. You’ll notice the mixture is becoming like a thick paste. Don’t worry; that’s science. Once you’ve added all the eggs stir in the orange juice and zest (if using).
4) Now carefully add the dry mixture to the wet mixture folding in to ensure the ingredients mix well to create a batter. This may have a little while but don’t panic.
5) Now you need to add in the fruit, nuts and carrots bit my bit. Fold in.
Note: please don’t reduce the amount of carrots thinking you don’t need that many. What’s a carrot cake without carrots?!
6) Now that you’ve managed to make the cake batter (well done you…you domesticated force of baking power). Pour the mixture into the prepared cake pan. Bake in the oven for 40/45 minutes until golden brown and a skewer comes out clean.
7) Allow the cake to cool and then remove from the tin.
8) to make the icing: whip the double cream until stiff. In a separate bowl whip together the cream cheese and icing sugar. Add the orange juice. Stir in. Fold in the double cream. Refrigerate until you ice the cake.
9) Ice the cake. I just added a layer all over and used cake decorations to add a bit of jazz.
I love bananas however my girls are not so keen on them so once in a while I find very ripe bananas in my fruit bowl and as someone that really does had waste I developed a Banana cake. Yes Banana bread is bloody awesome however cakes go down easier with my two.
I’ve added chocolate chips to this cake however feel free to omit them.
Ingredients:
125 grams butter softened
260 grams castor sugar
1 tsp vanilla flavouring
2 large eggs beaten
250 ml low fat yogurt
260 grams plain flour
1 tsp baking powder
1/2 tsp salt
3 large ripe (or over ripe) bananas mashed
50 grams chocolate chips ( I used milk chocolate chips)
1) pre heat your oven to 170/350/gas mark 4. Grease a 9 inch square pan.
2) beat together the sugar and butter.
3) Add the beaten eggs, yogurt and vanilla. Beat more. Don’t worry if it looks curdled; this will change when you add flour.
4) Add the flour, salt and baking powder and mix well.
5) Add the chocolate chips and mashed bananas and stir to combine.
6) Tip the mixture into the greased pan and bake for 35 minutes until lightly golden brown and a tooth peak comes out clear when you poke it in the middle of the cake.
Allow to cool completely. I usually leave the cake in the pan for 20 minutes and then transfer it to a cooling rack until it’s completely cool before attempting any icing.
To make the icing:
1) beat together the cream cheese, butter and icing until it forms an icing.
2) Spread onto the cooled cake. Cut into squares and serve.
I like to add banana chips to the top as decoration. This is purely optional. Enjoy!
I’m a huge fan of ribs but the sugar content of marinades puts me off…So here we have a recipe that is sweet, sticky but also a bit tart (thank you lemons).
I originally made this recipe for Halloween 2017; but I love it any time of the year.
I first cook the ribs in the slow cooker…and finish them off in the oven. You can just cook them i the oven if that makes it easier for you (I just wanted the meat to fall off…completely.
These guys actually taste awesome the next day too.
Serve with lots of napkins!
Ingredients:
1 KG mutton ribs (we asked for them to be chopped up)
1 1/2 cup ketchup
OR 1 cup ketchup & 1/2 cup chili sauce (if you want a fiery rib baby)
1/2 cup honey
1/2 cup lemon juice
1 tsp cayenne pepper
1/2 TBSP garlic powder
1/2 TBSP onion powder
1) Wash all the ribs and dry.
2) whisk all the ingredients together.
3) place the ribs in a ziploc bag (plastic food bag that can be sealed) and pour in 80% (the majority of the sauce) into the bag. Seal carefully and massage the ribs to get them covered in the sauce.
4) Leave to marinade overnight or for at least 3 hours; in the fridge.
5) To cook in the slow cooker: place the marinated ribs (and the sauce in the bag) into your slow cooker and cook on high for 3 hours.
6) Remove from the slow cooker (leaving any liquid in the slow cooker to dispose of) and place on a baking tray lined with greaseproof paper. Brush over the sauce you kept at step 3.
7) Bake in the oven at 180 for 15 minutes turning once and brushing with any remaining sauce.
8) Serve with plenty of napkins! The meat will be falling off….
Hands up if the morning rush has you feeling running around like you are running the country.
When you have lots of responsibilities towards family and loved ones you often neglect yourself. One of my own SELF LOVE things I do is have breakfast. Even if it’s a bowl of yogurt and a banana. But I do it. I also ensure my girls have a breakfast too. It’s the most important meal of the day.
What I like is a bit of variety. Let’s face it breakfast can get boring when it’s the same old cereal.
As we try to get the most out of our Saturdays I limit our Breakfast time to an hour. Its more than enough for us but also helps build our family tradition of having a leisurely breakfast together.
I’m aware of various fast food chains doing breakfasts which is awesome for those days when you need breakfast but may not have the time to cook them (we usually have a fast food breakfast when we visit our friends in Cambridge as it adds to the excitement on the weekend). So what’s the answer to me wanting a warm, instant breakfast that’s not too calorific in comparison to the fast food chains but doesn’t take years to prepare? Freezer Burritos!
Now before you scoff at the monitor/phone screen) here me out. Burritos are an awesome wrap that can be made the way you like them in bulk, frozen and then zapped in the microwave for less than 3 minutes and boom! Hot breakfast.
I love wraps. I also Mexican inspired food which is one of the reasons this is one of my favourite Breakfasts ever.
I churn out 24 breakfasts in 90 minutes which makes this a nice activity to do at the weekends. That’s approximately 4 minutes per breakfast. I think that’s awesome going really.
Slight caution: try not to overload your Burritos or else you won’t be able to roll them up.
So here’s my breakdown of what I put in my Burritos:
Scrambled eggs ( 2 eggs per Burrito)
Spinach (I wilt it down with lemon and a pinch of salt. I usually use frozen spinach and use one block per wrap)
Salsa (store bought. 1 tablespoon per Burrito)
Hash browns (I buy a bag of prepared hash browns for less than a pound in Aldi. I use one hash per wrap. I usually cut it in half. I cook the hash browns in the oven to save time)
Black (turtle) beans (a great way to add protein to the burritos. I use 1 tablespoon per Burrito.
Cheese-grated (I use mature cheddar as I get more flavour her gram. I use one tablespoon per Burrito. YOLO!).
Sausages ( I use lamb sausages and I grill or bake them at the same time as cooking my hash browns)
Sausage patties (If you are a vegetarian Quorn do awesome ones!)
Turkey bacon (as a non pork eater I use Turkey bacon. I also grill them with the sausages. Keep an eye on them and don’t over crisp them).
Crispy potatoes (for children you could even add waffles etc. Cook them in bulk in the oven and voila! Done!).
Sliced fried mushrooms (I fry a load off and use about two tablespoons per Burrito. If you want an extra flavour punch fry in garlic or chili oil)
Baked beans (minus the sauce so I drain them) I use 1 tablespoon per Burrito)
My favourite combinations:
The GREAT British combo: eggs, hash brown, sausage, bacon, beans, mushroom
Cheese, mushrooms, beans & bacon
Hash browns, bacon and cheese
Eggs, black beans, salsa & cheese
Mushroom, bacon, cheese
Beans, cheese & bacon
Just let your imagination run wild.
To make sure your Burritos keep their texture I drain off excess liquids (including fat off the sausages).
Okay what else will you need?
Large Torillas (doh!)
Greaseproof paper
Cling film
Ziploc bags
Marker pen to label your Burritos
And this is what I do:
I use large Tortillas
I create a conveyer belt and place all the cooked things in a line. Yes I do love a bit of organising that gets me going.
I then place the ingredients on the wrap and fold (click here to view an awesome video from…..on how to fold a Burrito!).
I then place the Burrito on greaseproof paper, label them, wrap them in cling film and place them in a ziploc bag.
Why have I not included amounts or recipes?
In all honesty I feel this is a DIY foodie hack you can play around with and personalise. I have included how much of each ingredient I put in my Burritos as an estimation guide for you guys.
To actually enjoy the Burritos. Take them out of the freezer. Remove the cling film and greaseproof paper and wrap in a damp kitchen towel. Blitz in the microwave on high for 3 minutes. Check the Burrito to see if it’s defrosted. If it’s still frozen ensure the kitchen towel is still damp and blitz for a further 2 minutes.
To eat: be careful to not burn yourself with the steam. Serve with a dollop of HP sauce or whichever sauce takes your fancy!
So guys what is your favourite combo? Comment below.