Leftover Cake Pudding

Stylemesisteradmin
July 19, 2019

No this is not an April Fools joke. Recently we had THREE cakes to mark the youngest child’s 6th Birthday and when you have that much cake sometimes you have leftovers. And when you have leftovers they can be somewhat drying.

When we think leftover cakes we think Cakepops. But this time I wanted to make something less laborous (we all know I like shortcuts).

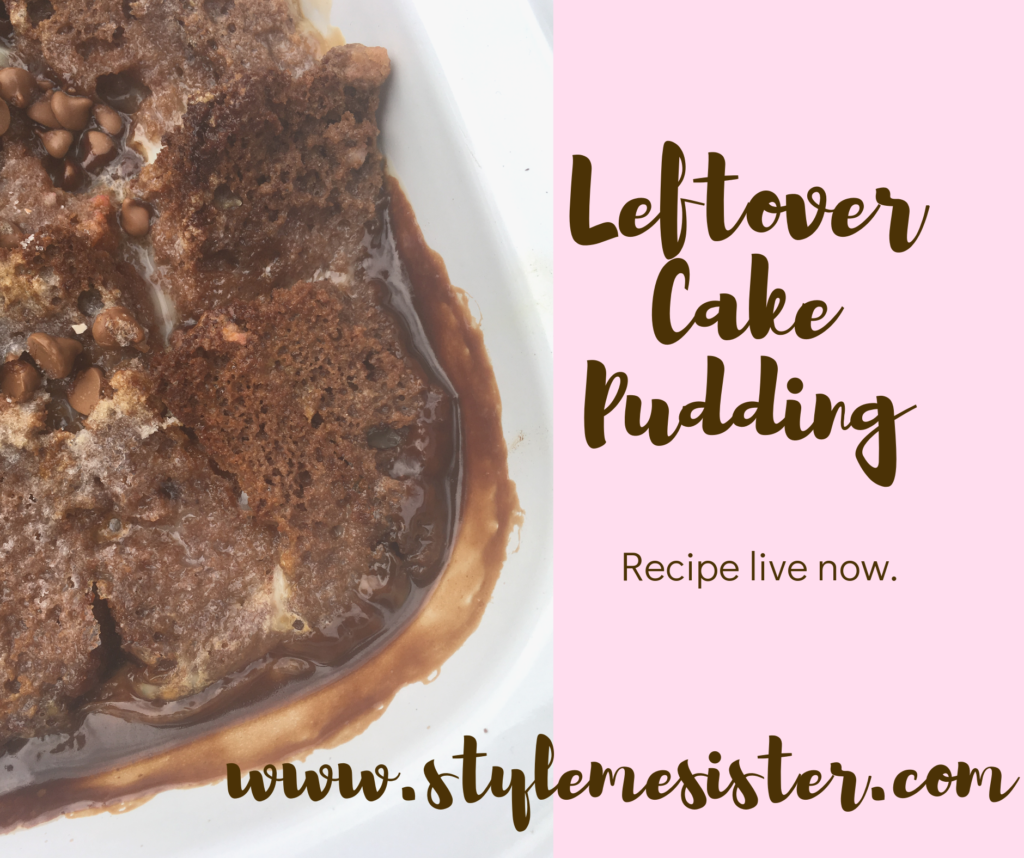
So after a bit of experimenting I opted for this….Cake Pudding…like Bread and Butter Pudding but with leftover cake.

This is amazing. I know I’m biased but it really is amazing!

To make enough Pudding to serve 4 you will need:

1/2 a double layered 20 CM cake. Ours was Chocolate flavoured and was ‘filled’ with Caramel flavour frosting.

500 ml milk

2 eggs

50 grams castor sugar (plus an extra TBSP for sprinkling).

100 grams chocolate chips

Optional: a tub of Caramel or Chocolate Frosting (we didn’t add any extra as the cake already had a layer in it OR about 3 heaped TBSP of Nutella or other chocolate based spread.

1) Remove the icing/frosting off the cake. Slice the cake up. Generally the thinner the slices the better. Just don’t make them too thin or they’ll fall apart.
2) If you wish to use the optional ingriedent of Nutella/Caramel spread it on half the slices. Then make ‘sandwiches’. So one slice of nutella’d cake with 1 slice of non-nutella cake.
3) Place the cake in an ovenproof dish (I used an old fashioned rectangular tin). I placed them so the point of the rectangle was at the top (and would be a bit crispy when I sprinkled on the sugar).
4) Whisk together the eggs, milk and sugar. Pour over the cake slices.
5) Sprinkle on the chocolate chips.
6) Place in the oven at 170C/Gas Mark 4 for 35-40 minutes.
7) Remove from the oven and serve with cream…ice-cream or whatever takes your fancy.

Alternative: if you wish to make a ‘chocolate’ custard mixture you could add the nutella to the milk mixture and whisk it in. Or if you want even more chocolate you could still apply nutella to the cake and also make the chocolate ‘custard’ mixture too.

Easy Lemon Curd Cupcakes

Alliyah Dawud
March 29, 2019

If there is any flavour of cake that doesn’t last in my household it’s lemon. My youngest is obsessed with lemon cakes of any shape or form. We made two dozen of these to give out for Ramadan at they proved a bit hit. With Spring in the air (British Summer Time has began in England; and you know what that means…one Happy Alliyah!). I thought you would love to bake a batch and enjoy them in the slightly warmer sun reminding us that Summer is on it’s way…

Feel free to half the recipe if you wish to make 12.

Ingredients:
250 grams butter (I use stork or store own brand version) at room tempreture
250 castor sugar
4 medium eggs
220 grams self raising flour
1 level tbsp baking powder
Juice of 4 lemons
Zest three of them
4 tbsp lemon curd (level spoons)

For the icing:
250 grams stork or other similar butter at room tempreture
550 grams icing sugar
2 tbsp lemon curd
1 tbsp boiling water
Optional extras: lemon decorations

1) preheat your oven to 170 (fan assisted) or 180 (non fan assisted). If you are an avid baker I really do recommend buying a stand alone thermometer you can pop in the oven to ensure baking tempratrues are even. Line two 12 hole muffin trays with cases (this recipe makes muffin size cupcakes).
2) Beat together the castor sugar and butter. This is called ‘creaming’ as you are creating a creamy buttery sugar mix. This shouldn’t take too long as long as the butter is at room tempretarure. You can also do this in a food processor. Either way cream away.
3) Now add the eggs-one by one. My tip is to crack each egg one by one into a bowl. That way if you end up with egg shell going into the egg it’s easier to fish out. Beat the egg in. Don’t worry if the mixture looks a bit curdled; this will be fixed when you add the flour.
4) Add the flour and baking powder and fold in.
5) Add the lemon juice and zest. Stir to combine.
6) Now add the lemon curd and gently whisk in. Don’t worry about combining it with the batter. If you can see the curd that’s absolutely fine.
7) Now spoon the mixture into the cupcake cases. Bake the cupcakes in the oven for 10/12 minutes (they’ll be a light golden colour). I usually use a cake testing skewer. Insert in the middle and if it comes out clear it’s all good. Place the cupcakes on a cooling rack.
TIP: don’t attempt to ice warm cupcakes. The mess is epic.

To make the icing:
Place the icing sugar and butter in a bowl and gently beat. Place in an icing bag (with a nozzle attached). Or use as you see fit.

To make the drizzle (optional):

Place the lemon curd in a jug/mug and add the boiling water. Whisk with a folk to create a ‘drizzle’. You may need to add a bit more water to get a drizzling consistency. If you find it’s too runny add a little bit more curd. Balance it out. I like a slightly runnier drizzle. You may prefer a more thicker one; hence why this part of the recipe is about testing until you find what you are happy with.

8) Once the cupcakes have cooled down ice them. Add the drizzle (it using) and decorations (ditto).

9) Enjoy.

These cupcakes keep in an airtight container for up to three days. Hot weather won’t help though. So if you wish to keep them in the summer months don’t ice them until you are ready to ravish them.

Winter Fruit Sponge

Stylemesisteradmin
November 23, 2018

Winter fruity Sponge Bake

Crisp colourful leaves on the ground. Bit knitted tops. Bowls of tomato soup and darker evenings watching box sets. Yes that pretty much sounds like Autumn. I love every season going and when the seasons change I often dream about what will happen in this season. Autumn to me is about comfort, appreciation and preparing for ‘come what may’. The colourful leaves followed by the crazy colourful fireworks have me lusting for this season a lot.

And as a baker with children with a sweet tooth I love experimenting with flavours and in Autumn I love gently spicing food with cinnamon, ginger and cardamom. The warm aroma makes me feel safe and snug.

What says ‘hey it’s Autumn’ to me is the combination of apples and blackberries. So here I have an awesome recipe for winter fruit sponge. It’s not too sweet, not too tart and has a spongy warm layer that says Autumn has arrived.
Serve this beauty with lashings of custard….or if you are still pining for Summer a scoop of vanilla ice-cream!

Ingredients:

For the fruity layer
500 grams Apples, Blackberries & plums
175 ml water
60 grams sugar
1 small cinnamon stick

For the spongy top:

125 grams butter at room temperature
125 grams castor sugar
125 grams self raising flour
1 tsp ground cinnamon
1 tsp baking powder
1 egg whisked
50 ml milk

1) Place the apples, cinnamon and sugar in a pan and bring to the boil. Lower the heat and cook for 5 minutes.
2) Add the blackberries and cook for a further 2/3 minutes. Turn off the heat.
3) In a large bowl beat together the sugar and butter until creamed together. Add the egg and beat further.
4) Add the flour baking powder and ground ginger and beat. Don’t worry if it looks a bit lumpy that will be fixed later.
5) Now add the milk and stir in.
6) Take the baking tin and place the apple and blackberry in it. Spread evenly. Remove the cinnamon stick.
7) Pour over the sponge mix and spread evenly with a spatula.
8) Bake at 170 for 25 minutes (or until golden brown).
9) Take out of the oven and serve warm with custard.
10) Enjoy!

Child improved Carrot Cake…

Stylemesisteradmin
November 16, 2018

Carrot Cake

I have a soft spot for delectable carrot cake. When I was younger I used to heave at the idea of a vegetable in a cake. Actually I just disliked all vegetables as my parents lacked the kitchen skills of cooking vegetables without blitzing them into a ghastly grey mush.

So when I was older I discovered my love of cinnamon, orange and carrots combined in a carrot cake. The sweet yet spiciness from the cinnamon and the slight zesty taste from the orange married to carrots in a sponge had be at hello.

Over the years I’ve tried various recipes and I have to admit the best one I have found it the one I have below. I actually make the cake without raisins or nuts as my youngest loves carrot cake (she loves cinnamon) but cannot stand nuts or raisins. So rest assured that if you need to omit these ingredients this cake still tastes bloody awesome!

This cake also freezes well so I cut it into slices, wrap it into greaseproof paper and freeze it with the intention of using it up within 3 months. Don’t forget that leftover cake can also be used as a trifle base. So really there’s no reason for wastage here.

This cake is pretty easy to put together however I’ll warn you now; peeling and grating took me about 20 minutes. So if you have children who like carrot cake encourage them to help.

Ingredients:

Dry ingredients:
260 grams plain flour
2 tsp baking powder
1 tbsp ground cinnamon (less if you are not a friend of cinnamon)
1 tsp salt

Wet ingredients:
300 grams castor sugar
300 ml vegetable oil
4 medium eggs
Juice of one orange (& fine zest if you like citrus)

Fruit, nuts & Vegetables:
4 large carrots peeled and grated (or 6 medium carrots)
60 grams chopped up walnuts & a few ‘whole’ pieces to decorate the cake
60 grams raisins

Icing:
100 grams cream cheese
250 grams icing sugar
100 ml double cream
1 TBSP orange juice

1) Heat your oven to 170 c. Grease a 20 CM (8 inch) size round cake tin. I usually use Wiltons cake release as it it’s basically like greasing and flouring all in one but with no mess. You squirt a bit on the pan and brush it around. That’s optional; you can also use greaseproof paper to line your tin.

Note: you can use this recipe to make cupcakes. Fill large muffin tins up to 2/3 and bake for 20/25 minutes.

2) In a large bowl mix together the dry ingredients. Set to one side.

3) In another large bowl (the bigger the better trust me on this!) mix together the oil and sugar. Add the eggs, a bit at a time (you can add one at a time to make it easier for you). Beat together. You’ll notice the mixture is becoming like a thick paste. Don’t worry; that’s science. Once you’ve added all the eggs stir in the orange juice and zest (if using).

4) Now carefully add the dry mixture to the wet mixture folding in to ensure the ingredients mix well to create a batter. This may have a little while but don’t panic.

5) Now you need to add in the fruit, nuts and carrots bit my bit. Fold in.
Note: please don’t reduce the amount of carrots thinking you don’t need that many. What’s a carrot cake without carrots?!

6) Now that you’ve managed to make the cake batter (well done you…you domesticated force of baking power). Pour the mixture into the prepared cake pan. Bake in the oven for 40/45 minutes until golden brown and a skewer comes out clean.

7) Allow the cake to cool and then remove from the tin.

8) to make the icing: whip the double cream until stiff. In a separate bowl whip together the cream cheese and icing sugar. Add the orange juice. Stir in. Fold in the double cream. Refrigerate until you ice the cake.

9) Ice the cake. I just added a layer all over and used cake decorations to add a bit of jazz.

10) Serve with a cuppa.

Banana Cake

Stylemesisteradmin
November 9, 2018

Banana Cake with frosting

I love bananas however my girls are not so keen on them so once in a while I find very ripe bananas in my fruit bowl and as someone that really does had waste I developed a Banana cake. Yes Banana bread is bloody awesome however cakes go down easier with my two.

I’ve added chocolate chips to this cake however feel free to omit them.

Ingredients:

125 grams butter softened
260 grams castor sugar
1 tsp vanilla flavouring
2 large eggs beaten
250 ml low fat yogurt
260 grams plain flour
1 tsp baking powder
1/2 tsp salt
3 large ripe (or over ripe) bananas mashed
50 grams chocolate chips ( I used milk chocolate chips)

Icing:

110 grams cream cheese
50 grams butter
300 grams icing sugar
Banana Chips-OPTIONAL

1) pre heat your oven to 170/350/gas mark 4. Grease a 9 inch square pan.
2) beat together the sugar and butter.
3) Add the beaten eggs, yogurt and vanilla. Beat more. Don’t worry if it looks curdled; this will change when you add flour.
4) Add the flour, salt and baking powder and mix well.
5) Add the chocolate chips and mashed bananas and stir to combine.
6) Tip the mixture into the greased pan and bake for 35 minutes until lightly golden brown and a tooth peak comes out clear when you poke it in the middle of the cake.

Allow to cool completely. I usually leave the cake in the pan for 20 minutes and then transfer it to a cooling rack until it’s completely cool before attempting any icing.

To make the icing:

1) beat together the cream cheese, butter and icing until it forms an icing.
2) Spread onto the cooled cake. Cut into squares and serve.

I like to add banana chips to the top as decoration. This is purely optional. Enjoy!