Winter Fruit Sponge

Stylemesisteradmin
November 23, 2018

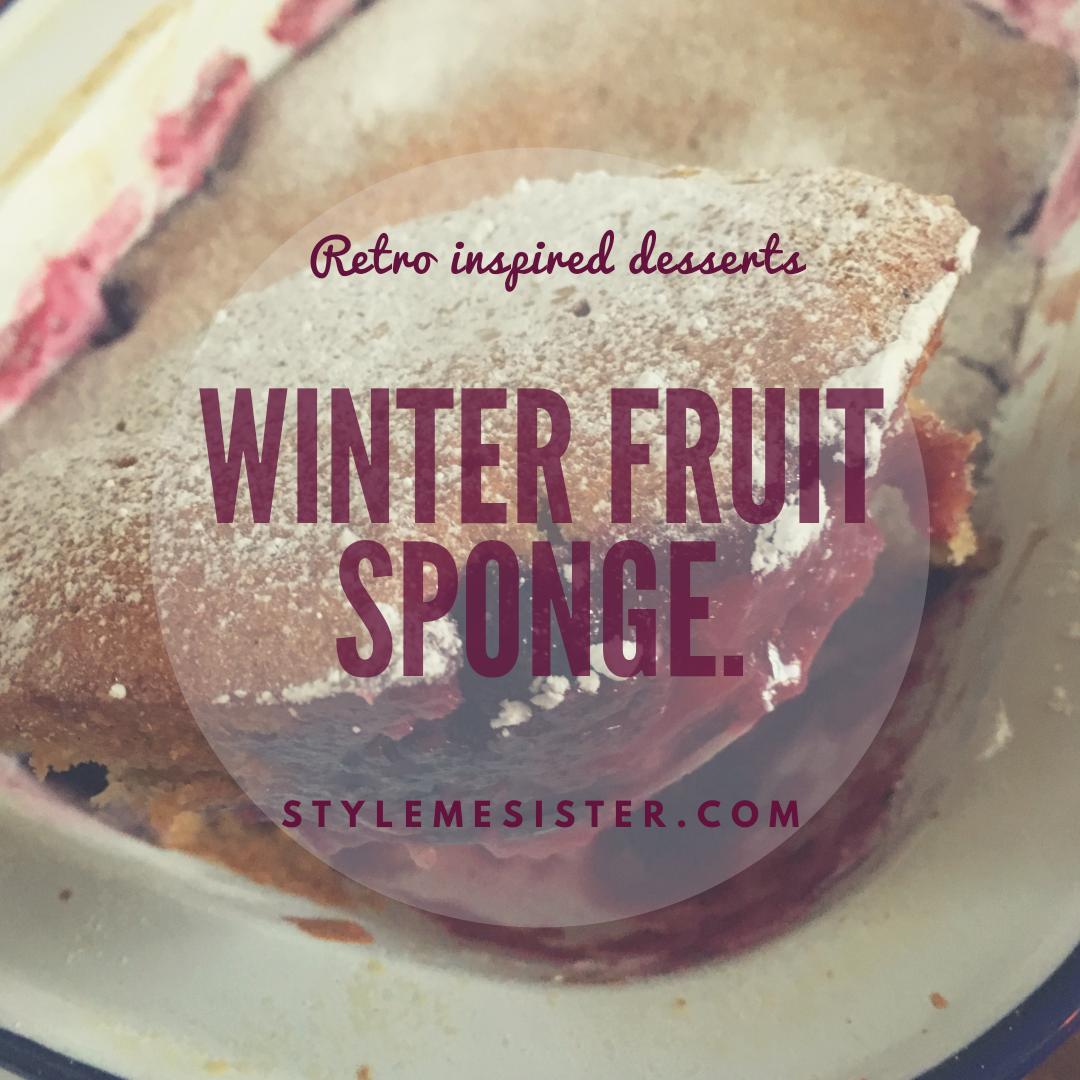
Winter fruity Sponge Bake

Crisp colourful leaves on the ground. Bit knitted tops. Bowls of tomato soup and darker evenings watching box sets. Yes that pretty much sounds like Autumn. I love every season going and when the seasons change I often dream about what will happen in this season. Autumn to me is about comfort, appreciation and preparing for ‘come what may’. The colourful leaves followed by the crazy colourful fireworks have me lusting for this season a lot.

And as a baker with children with a sweet tooth I love experimenting with flavours and in Autumn I love gently spicing food with cinnamon, ginger and cardamom. The warm aroma makes me feel safe and snug.

What says ‘hey it’s Autumn’ to me is the combination of apples and blackberries. So here I have an awesome recipe for winter fruit sponge. It’s not too sweet, not too tart and has a spongy warm layer that says Autumn has arrived.
Serve this beauty with lashings of custard….or if you are still pining for Summer a scoop of vanilla ice-cream!

Ingredients:

For the fruity layer
500 grams Apples, Blackberries & plums
175 ml water
60 grams sugar
1 small cinnamon stick

For the spongy top:

125 grams butter at room temperature
125 grams castor sugar
125 grams self raising flour
1 tsp ground cinnamon
1 tsp baking powder
1 egg whisked
50 ml milk

1) Place the apples, cinnamon and sugar in a pan and bring to the boil. Lower the heat and cook for 5 minutes.
2) Add the blackberries and cook for a further 2/3 minutes. Turn off the heat.
3) In a large bowl beat together the sugar and butter until creamed together. Add the egg and beat further.
4) Add the flour baking powder and ground ginger and beat. Don’t worry if it looks a bit lumpy that will be fixed later.
5) Now add the milk and stir in.
6) Take the baking tin and place the apple and blackberry in it. Spread evenly. Remove the cinnamon stick.
7) Pour over the sponge mix and spread evenly with a spatula.
8) Bake at 170 for 25 minutes (or until golden brown).
9) Take out of the oven and serve warm with custard.
10) Enjoy!

Child improved Carrot Cake…

Stylemesisteradmin
November 16, 2018

Carrot Cake

I have a soft spot for delectable carrot cake. When I was younger I used to heave at the idea of a vegetable in a cake. Actually I just disliked all vegetables as my parents lacked the kitchen skills of cooking vegetables without blitzing them into a ghastly grey mush.

So when I was older I discovered my love of cinnamon, orange and carrots combined in a carrot cake. The sweet yet spiciness from the cinnamon and the slight zesty taste from the orange married to carrots in a sponge had be at hello.

Over the years I’ve tried various recipes and I have to admit the best one I have found it the one I have below. I actually make the cake without raisins or nuts as my youngest loves carrot cake (she loves cinnamon) but cannot stand nuts or raisins. So rest assured that if you need to omit these ingredients this cake still tastes bloody awesome!

This cake also freezes well so I cut it into slices, wrap it into greaseproof paper and freeze it with the intention of using it up within 3 months. Don’t forget that leftover cake can also be used as a trifle base. So really there’s no reason for wastage here.

This cake is pretty easy to put together however I’ll warn you now; peeling and grating took me about 20 minutes. So if you have children who like carrot cake encourage them to help.

Ingredients:

Dry ingredients:
260 grams plain flour
2 tsp baking powder
1 tbsp ground cinnamon (less if you are not a friend of cinnamon)
1 tsp salt

Wet ingredients:
300 grams castor sugar
300 ml vegetable oil
4 medium eggs
Juice of one orange (& fine zest if you like citrus)

Fruit, nuts & Vegetables:
4 large carrots peeled and grated (or 6 medium carrots)
60 grams chopped up walnuts & a few ‘whole’ pieces to decorate the cake
60 grams raisins

Icing:
100 grams cream cheese
250 grams icing sugar
100 ml double cream
1 TBSP orange juice

1) Heat your oven to 170 c. Grease a 20 CM (8 inch) size round cake tin. I usually use Wiltons cake release as it it’s basically like greasing and flouring all in one but with no mess. You squirt a bit on the pan and brush it around. That’s optional; you can also use greaseproof paper to line your tin.

Note: you can use this recipe to make cupcakes. Fill large muffin tins up to 2/3 and bake for 20/25 minutes.

2) In a large bowl mix together the dry ingredients. Set to one side.

3) In another large bowl (the bigger the better trust me on this!) mix together the oil and sugar. Add the eggs, a bit at a time (you can add one at a time to make it easier for you). Beat together. You’ll notice the mixture is becoming like a thick paste. Don’t worry; that’s science. Once you’ve added all the eggs stir in the orange juice and zest (if using).

4) Now carefully add the dry mixture to the wet mixture folding in to ensure the ingredients mix well to create a batter. This may have a little while but don’t panic.

5) Now you need to add in the fruit, nuts and carrots bit my bit. Fold in.
Note: please don’t reduce the amount of carrots thinking you don’t need that many. What’s a carrot cake without carrots?!

6) Now that you’ve managed to make the cake batter (well done you…you domesticated force of baking power). Pour the mixture into the prepared cake pan. Bake in the oven for 40/45 minutes until golden brown and a skewer comes out clean.

7) Allow the cake to cool and then remove from the tin.

8) to make the icing: whip the double cream until stiff. In a separate bowl whip together the cream cheese and icing sugar. Add the orange juice. Stir in. Fold in the double cream. Refrigerate until you ice the cake.

9) Ice the cake. I just added a layer all over and used cake decorations to add a bit of jazz.

10) Serve with a cuppa.

Banana Cake

Stylemesisteradmin
November 9, 2018

Banana Cake with frosting

I love bananas however my girls are not so keen on them so once in a while I find very ripe bananas in my fruit bowl and as someone that really does had waste I developed a Banana cake. Yes Banana bread is bloody awesome however cakes go down easier with my two.

I’ve added chocolate chips to this cake however feel free to omit them.

Ingredients:

125 grams butter softened
260 grams castor sugar
1 tsp vanilla flavouring
2 large eggs beaten
250 ml low fat yogurt
260 grams plain flour
1 tsp baking powder
1/2 tsp salt
3 large ripe (or over ripe) bananas mashed
50 grams chocolate chips ( I used milk chocolate chips)

Icing:

110 grams cream cheese
50 grams butter
300 grams icing sugar
Banana Chips-OPTIONAL

1) pre heat your oven to 170/350/gas mark 4. Grease a 9 inch square pan.
2) beat together the sugar and butter.
3) Add the beaten eggs, yogurt and vanilla. Beat more. Don’t worry if it looks curdled; this will change when you add flour.
4) Add the flour, salt and baking powder and mix well.
5) Add the chocolate chips and mashed bananas and stir to combine.
6) Tip the mixture into the greased pan and bake for 35 minutes until lightly golden brown and a tooth peak comes out clear when you poke it in the middle of the cake.

Allow to cool completely. I usually leave the cake in the pan for 20 minutes and then transfer it to a cooling rack until it’s completely cool before attempting any icing.

To make the icing:

1) beat together the cream cheese, butter and icing until it forms an icing.
2) Spread onto the cooled cake. Cut into squares and serve.

I like to add banana chips to the top as decoration. This is purely optional. Enjoy!