Easy Rajmah Tikkis

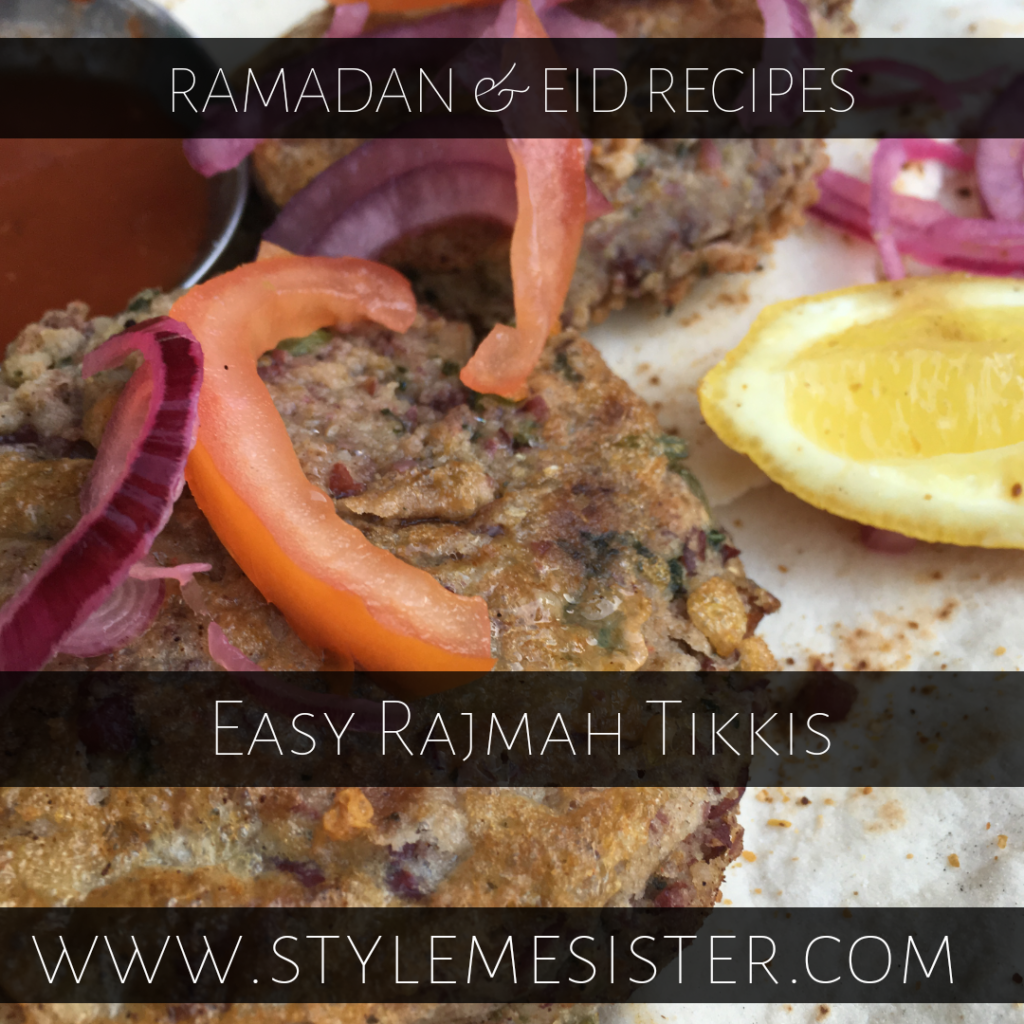
Alu Tikkis are one of my favourite all time desi foods. My love of tikkis means I am always trying to come up with variations that are healthy and will bring a bit of va va voom to the dinner table.

I love Rajmah dhal. Its at number two at my favourite and most cooked dhal at home (Tarka dhal being at number one). Nowadays you can pick up cooked Kidney Beans in a can for around 30 pence in England. I usually use two cans to make myself Rajmah dhal and believe me pre-cooked anything saves time in the kitchen.

My love of lentils, pulses and healthier desi food brought me onto the idea of making a tikki from this bean.

This recipe combines a bit of potato with the beans. I find this definitely helps the texture of the tikkis and also helps keeps them together. Plus it reduces down the carbs in the Tikki.

This is a nice, economical recipe. You can use wonky potatoes to make these tikkis.

These Tikkis can be frozen up to a month successfully. Fry them, cool them, open freeze them on a baking sheet for around an hour and then wrap them in greaseproof paper before placing them in an airtight freezer container or ziploc bag.

To make enough to serve 4 you’ll need:

  • 1 x 400 grams Red Kidney Beans rinsed and drained
  • 200-250 grams potatoes-boiled (that’s two medium potatoes if you are not fussed my weights).
  • Salt-to taste
  • 1 & 1/2 TBSP cornflour
  • 1 heaped TBSP coriander leaves chopped finely
  • 1 TSP cumin seed powder
  • 1 TSP coriander seed powder
  • 1/2 TSP chili powder

Oil-to shallow fry

1) Mash the potatoes and the kidney beans to form a mash/dough. You can blitz the beans in a processor if that makes you feel better because lets face it. Mashing beans isn’t all fun and games.

2) Now add all the other tikki ingredients to the mixture. Using your hands mix well.

3) Using wet hands shape your tikkis. You can make medium ones using a walnut size amount of mixture. Or if you want to serve these as canapes/starters make them smaller.

4) In a large pan heat the oil on a medium heat. Fry the tikkis on a medium heat until lightly golden brown. Do not keep turning the tikkis over as this will increase the chances of breaking them.

5) Once brown on both sides drain off on kitchen paper.

6) Serve with chutneys and sauces of your choice.

NOTES: the corn flour is added to help keep the tikkis together. If you cannot get your hands on it replace with Basan (gram flour).

The beans and potatoes are already cooked so don’t worry if the tikkis are fried to golden brown within minutes. Kidney beans only cause problems if they are not cooked properly. And in this case they are already cooked.

Additional Tip: I use my trusted potato ricer to mash the potatoes. I don’t even need to peel the potato to use it. I can boil the potato whole (skin on) or bake it (skin on of course) and put it through the ricer.

Coriander and Lemon Potato Curry


I’ll be frank with you. I love curries but I get bored of the same old same old situation.
When the (former) Boss and I decided to have Lunch at mine I created what I would consider a Vegetarian Banquet. I absolutely love vegetarian curries. I believe they showcase how awesome and easy vegetables are to work with. Plus with my healthy food kick I am always looking at healthier meals. It helps that I love daals/pulses!

One of the curries I created was this one. Its a simple, frugal curry I believe is perfect for Spring and Summer as it’s lighter than other curries. There’s no tomatoes in this curry and that’s why it wouldn’t look like a standard red curry.

I serve this curry with plain boiled rice. It also tastes equally awesome the next day. It cooks in less than 30 minutes and children love it too.

This recipe is actually VEGAN. So to my vegan readers I hope this is music to their ears.

To serve 4-6 people (depending on curry portion sizes)

400 grams (baby potatoes work, as do standard potatoes cut into rounds that are pound thickness).
2 RBSP rapeseed oil
1 large onion sliced thinly
5 cloves of garlic-crushed
4 TBSP fresh coriander (including stalks) chopped finely
2 lemons-juiced
1 TBSP coriander seed powder crushed
1 TBSP cumin powder
Salt-to taste
OPTIONAL: 1 TSP chili powder or 1 TSP chili flakes.
1500-2000 ml water (plain stuff from the tap)

To serve:
Lemon wedges (optional)
Yogurt (vegan to keep the recipe vegan)-optional
Plain boiled rice ( I use Basmati).

I assume you guys have prepared the ingredients as above…lets get cracking.

1) Heat the oil in a large pot on a medium heat. Add the sliced onion and fry until onions are soft NOT browned.
2) Add the potatoes and stir well. ‘Fry’ for 5 minutes stirring to ensure the potatoes don’t stick.
3) Now add the garlic and fry for one minute. You’ll be ‘hit’ with a shot of garlic scent. That tells us we are ready for the next step.
4) Now add the salt and dried spices. Stir well to coat the potatoes. If the spices start to ‘burn’ or the mixture starts to stick add 2 TBSP of water to the potatoes.
5) Add HALF the coriander. Stir well.
6) Now add 1500 ml (1.5 litres) to the potatoes. Bring to the boil and then reduce the heat and cover the pan. You need to cook the potatoes until tender. Now this will vary depending on which potatoes you are using. So after 8 minutes ‘test’ the spuds. I usually do this by carefully inserting a sharp knife tip into the potato. If it starts to fall apart its done. It its hard as nails you need to cook it more. I found my standard potatoes took 18 minutes too cook. Now you will be thinking why do you have water left over? Answer: if you want a more ‘runny’ curry you need to add all the liquid. If you prefer a drier curry stick to 1500 ml. Always remember that if water evaporates too quickly the potatoes won’t cook and you need to add more. It’s that simple.
7) Once the potatoes are cooked turn off the heat. Now add the remaining coriander and lemon juice. Stir through.
8) Serve!

I served with rice but you can serve the curry with Naans or maybe Parathas.

Store leftovers in the fridge and warm through thoroughly before serving.

Delicious.

Bean and Egg Burritos

Alliyah Dawud
April 26, 2019

Easy peasy spicy egg and black bean burritos (An awesome Breakfast)

Eggs are awesome. Not only do they cook fast but they are cheap, nutritious but are also versatile.

Black beans are magic. I bulk boil them and freeze them so I have a constant supply. I use them in tex mex dishes, Quesadillas, salads, rice bowls and these awesome Burritos.

If you use freshly boiled beans you can make some extra Burritos to freeze so you always have a hot Breakfast on hand in the freezer. Plus these bad boys are healthier than a lot of the ready made stuff you can pick up at certain fast food places.

This is a great recipe to use for bulk preparing Breakfasts.

To make two of these bad boys you will need:

2 large tortilla wraps

  • 4 eggs (see note below)
  • Red Chili powder (to your tasting: I find a 1/4 of a tsp is enough as I also add chili sauce)
  • 2 TBSP milk
  • Salt
  • Pepper
  • (whisk the eggs with the milk, salt and pepper)
  • 1 TBSP oil (or a small knob of butter)
  • 6 TBSP cooked black beans
  • TBSP salsa (I use a chunky one)
  • Optional: chili sauce
  • Coriander leaves

1) Whisk the eggs, milk, salt and pepper together.
2) Heat a medium pan and add the butter (or oil) on a medium heat. Now add the egg mixture and stir well. It will start to form clumps of egg. That’s what you want. Cooking the eggs should take around 4-5 minutes.
3) Lightly warm the wrap.
4) Place on a large chopping board or plate and add half the mixture. Add half the beans. Push the mixture towards the centre (I would watch a Burrito rolling video to understand the technique).
5) Add the beans and salsa. Add the coriander (if using) Sprinkle on the cheese. Add chili sauce if required.
6) Now roll that bad boy up!
7) Serve!

To freeze:
Roll up the Burritos and wrap in Cling film. Then place in a ziploc bag, label and freeze.

To heat up: take out of the freezer. Remove from the bag and remove the cling film . Take a piece of kitchen paper and dampen it. Wrap it with the paper (loosely) and zap in the Microwave for 2.5-3 minutes. Remove the kitchen paper carefully to avoid it sticking to the Burrito. Remove from the Microwave and allow to stand for 2/3 minutes. Check the Burrito is defrosted and heated completely before eating.

Serve with a big dollop of Ketchup or my favourite Chili and Garlic Ketchup (sold at most Asian food stores).

Slow Cooker Taco Soup

Alliyah Dawud
February 8, 2019

I love my Slow Cooker (crockpot). I use it on the regular…even in the hotter months as it doesn’t heat up the kitchen.

I love tacos….and also easy family meals where you don’t need to weigh out ingredients. So here I present to you my Taco Soup…which tastes soooooo good. And no two bowls are the same when you pimp it up with various toppings.

Makes enough for 6 large bowls. I’ve successfully frozen leftovers too.

Ingredients:

SOUP:
500 grams browned mince (or raw mince)
2 small onions diced finely
1 400 gram tin chopped tomatoes
200 ml water
1 tbsp salt (or less depending on your dietary requirements)
1 tbsp cumin powder
1 tbsp coriander powder
1 tbsp dried mexican oregano (or standard oregano)
2 tbsp fresh coriander chopped finely
1 tsp chili powder
1 tsp smoked paprika (or standard paprika)

Add the following 30 minutes before serving:
1 400 gram red kidney beans drained
1 400 gram white kidney beans drained

To thicken the soup:
1 tbsp cornstarch

Optional items:
1 whole chipolote chili
Liquid smoke

Garnishes/toppings (mix and match as you please):

Soured cream or low fat yogurt
Grated cheddar cheese
Crushed up taco shells
Crushed up torilla chips
Lemon or lime wedges
Tomatoes chopped finely (I like using cherry tomatoes as they are sweeter but that’s optional normal tomatoes will also work)
Red onion-finely chopped
Jalepeno pepper slices
Fresh coriander leaves-chopped finely
For extra heat fresh chili finely chopped

1) Place all the ingredients listed under soup in your Slow Cooker. Turn the Slow Cooker on to a high. Cook for 3 hours.
2) Now add the drained kidney beans. Stir through. Add two tablespoons of water to the cornstarch and mix. Add the mixture to the soup and stir. This will thicken the soup up for you. If you don’t like thicker soups just skip this step!
3) Place the lid back on and leave for another 25-30 minutes. Turn off and remove lid if you don’t want the beans to ‘cook’ further.
4) Ladle into bowls and serve garnished as you wish. I make a ‘toppings bar’ and allow everyone to personalise their own soup.
5) Leftovers will keep for 48 hours easily in the fridge. Can also be successfully frozen (use within a month).