Chicken Chapali Kebab

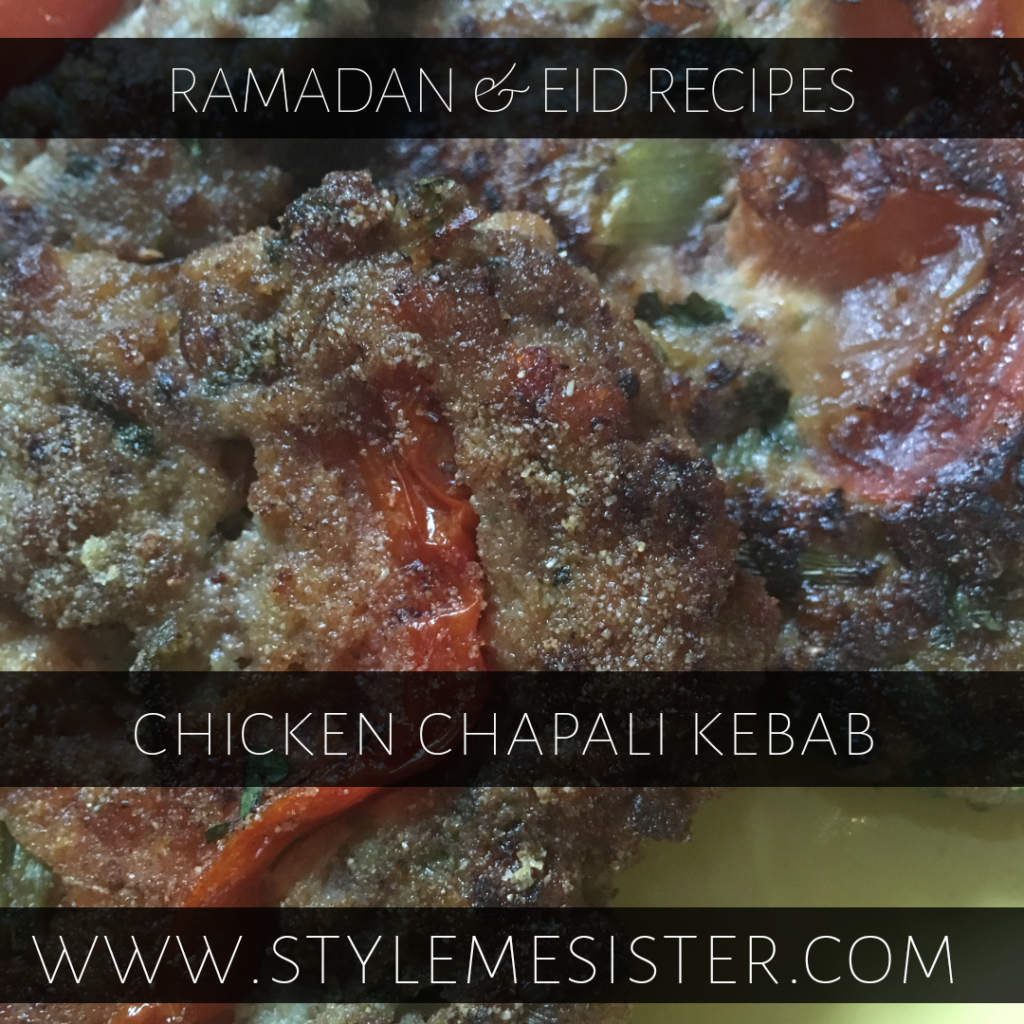
Chicken Chapali Kebabs

Mutton Chapali Kebabs are associated with the NWFP area of Pakistan. Coming from what can only be described as a bag of pick and mix I do have a little Pathan in me.

Chapali Kebabs are tangy but not spicy. You can find them being sold by the Road side across Pakistan and other Asian countries too…..

What I also have in me thanks to my Pathan blood is impatience.

To make the recipe quicker, and healthier I decided to replace the Mutton mince with Chicken (leaner) and as its Chicken it cooks quicker.

This recipe also works out cheaper (Chicken Mince costs £2.59 per KG at my local Butcher). So it’s healthier, quicker and economical. Bonus.

This recipe is a blend of what I’ve picked up from many family members. My thoughts on family variations of classic recipes is if we didn’t have variation then you haven’t eaten them enough…..

To make enough Kebabs to serve 4 you will need

  • 500 grams chicken mince.
  • 2 TBSP cornmeal
  • 1/2 TBSP salt
  • 1 TSP chili powder
  • 1 TSP coriander powder
  • 1 tsp whole dried pomegranate seeds
  • 1 TBSP pomegranate seed powder (I buy a bag of seeds and grind some down to make the powder).
  • 2 green chilis minced (finely chopped will also do!)
  • 1/2 a tomato chopped finely
  • 2 TBSP coriander leaves and stalks chopped finely
  • 1 medium onion finely chopped

To finish off (optional)
1 tomato thinly sliced
2 TBSP cornmeal

The quick chutney:

  • 3 green chilies
  • salt (to taste)
  • around 16 mint leaves
  • 2 TBSP (heaped) of coriander and leaves and stalks chopped
  • 2 TBSP dried pomegranate seed powder
  • juice of 1 lemon
  • 1 medium tomato

To cook:
Oil to Shallow Fry

1) Mix all the kebab ingredients together.
2) Take a TBSP of the mixture and with wet hands shape them into oblong kebabs.
3) OPTIONAL step: lightly press on the thin tomato slice and sprinkle on some cornmeal.
4) Heat the oil in a large pan on a medium heat.
5) Fry the kebabs until golden brown on both sides (mine took 3 minutes on each side-just remember if the kebabs are thick you need to cook them all the way through). Don’t overcrowd the pan. It will make sloppy greasy kebabs.
6) Drain the kebabs on kitchen paper and serve with Naans and Kebab Chapali Kebab chutney (it’s tangy as its got even more pomegranate in it).

To make the chutney: blitz all the ingredients together. You’ll end up with a ‘rough’ looking chutney but that’s what you are looking for. To make the pomegranate powder you just need to blitz the seeds in your spice grinder or coffee bean grinder.

These Kebabs can be frozen successfully and used with 3 months.
The chutney doesn’t freeze well.

My mixed Pakoras

My Awesome Pakoras!

Who doesn’t love some Pakoras with a cup of Tea (actually Chai) right?

Here are my favourite Pakoras using my Awesome Pakora mix (check out yesterdays post for the recipe). Note that I have added a few tweaks that I think enhance the recipe.

This post is more of a ‘tutorial’ or suggestion piece (just in case you are looking for exact ingredients).

I love my Pakoras with my quick and easy Masala Chai.

For some extra flavour you can sprinkle Chaat Masala over the cooked Pakoras.

Don’t forget the Chutneys and dipping sauces.

To make the mixed Pakoras here’s what you will need:

Cauliflower Pakoras
I used 250 grams of frozen cauliflower boiled until cooked but not OVER cooked.

I then used my Pakora Mix and add 1 TSP of ground ginger, and 1 tsp of dried fenugreek leaves to the mix.

Make the Pakora dipping mix and dip in the cauliflower and deep fry until golden brown.

Aubergine Pakoras

You’ll need one firm Aubergine sliced thinly.

Make up the Pakora dipping mix, dip and deep fry until golden brown.

Egg Pakoras

Now don’t write off the idea of the humble egg when it comes to Pakoras.

Hard boil a couple of eggs, cool and peel. Cut in half and dip into the Pakora dipping mix. Deep fry gently and drain well.

Pre-boiled Potato Pakoras

One of my childhood favourites is the humble yet gracious Alu Pakora.

To make these babies boil 2 whole medium potatoes with their skin on. Once boiled and cooled completely peel off the skin and cut the potatoes into rounds (about the thickness of a pound).

Make the Pakora dipping mix and add 1 TSP coriander leaves finely chopped, dip in the potatoes and deep fry until golden brown.

Sprinkle with some chaat masala. Enjoy.

How do you take your Pakoras? Drop your comments and feedback below.

Alliyahs awesome (bulk) Pakora Mix

My bulk Pakora mix

Ramadan Kareem by lovely folk!

For many Asians Pakoras are an essential foodie item on the Ramadan schedule. I’ll admit that as a child I associated these golden nuggets of yumminess with the holy month.

This Ramadan I will be posting recipes I find easy, economical and a bit different to the standard Ramadan feasts we are so used to. And as someone who tries to make healthy eating a part of family life I want to provide recipes I use at home and have tweaked to make them slightly better than the mainstream counterparts. I also like the idea of ‘freestyling’ in the kitchen so I sometimes don’t have exact weights for ingredients just like the average Mama won’t whilst cooking to feed her brood.

I’ll also post shorter articles during the blessed month too. Feel free as always to share the blog posts with your nearest, dearest and folk who love food!

Nowadays I enjoy Pakoras when I want however I know many that spend hours preparing the gram flour mix during the month of Ramadan.

I’m here to suggest that you mix it all in bulk…and cut your work load. Literally!

I make a big batch of Pakora mix to save time and also money. Pre-mixed boxes work out more expensive. The only real convenience they bring to the kitchen is the fact all the spices have been added. That’s it.

Here is my recipe for my Pakora Mix. I’ve made up batches and used them over 2 months so I’ve had no problems at all. I’ve listed the spices I use as standard.

I don’t actually add ‘chili’ in the form of Chili Powder until I’m making a batch of Pakoras. This works for me as I don’t give my daughters lots of chili.

If you are avoiding salt then by all means adjust the recipe to reflect that.

To make a huge batch of Alliyahs Pakora Mix you will need:

4 cups of Gram Flour (that’s chickpea flour aka Basan) sifted into a large bowl
1 TBSP baking powder-sifted into the bowl
2 TBSP salt
1 TBSP dried coriander leaves (heaped)
2 TBSP coriander powder (heaped)
2 TBSP cumin powder (heaped)
2 TBSP carom seeds-whole (heaped)
1 TBSP garam masala powder (heaped)

1) If you haven’t already done it sift the basan (gram flour) and baking powder into a large bowl.
2) Add the spices and stir to eventually distribute the ingredients.
3) Decant the mix into a airtight container.
Your mix is ready to use.

I usually make a test batch of Pakoras so I know if I need to add more spices.

NOTE: to make the Pakora mixture I add 2 TBSP of coriander leaves (finely chopped up) to the mixture.

To use the mix:
There’s two ways I use this mix.

1) Make a thick paste (it should coat the back of a wooden spoon) and dip in your favourite vegetables and deep fry until golden brown.

2) Cut up your vegetables and add 3 tablespoons of the mix. Add a little water and mix to coat the vegetables and create a sticky mix. If the mixture is too gloopy add a bit of water. If you cannot see the Pakora mix and the vegetables are not coated add more mix. It’s a bit of trial and error depending on how much vegetables you are using.

Don’t forget to add some chili powder if you need something a bit more spicy.

Enjoy your Pakoras! What do you usually serve with yours? Drop us a message below.

Why you need to set up a Ramadan Cookery Circle

Ramadan is the most blessed months a Muslim can experience. Its a time for contemplation. A time to reflect and change the direction of life. Its a time to give back to charity. It’s a time to get closer to our faith.

Sadly for many sisters its a time where they find themselves chained to the kitchen when they should be reaping the rewards of this awesome month.

For a lot of families food plays a huge part in Ramadan. There’s Sahoor and Iftaars to plan, prepare and cook. Then there’s hosting Iftaars for nearest and dearest (which FYI I haven’t done in a decade). That’s a large chunk of time on a daily basis. By the time you’ve cooked and cleaned up energy levels are at a low and the idea of staying up to repent or pray is near impossible (because half hearted recitation is also a no-no; you want to focus and give it your best).

A couple of years ago I started to batch cook food used in Ramadan and froze it in suitable sized portions. This helped me no end. There was no last minute mad panic in the kitchen. Things ran smoothly; very smoothly.

I then came to the realisation that my issue of balancing the time spent preparing and cooking food with the actual important duties of Ramadan were a problem for a lot of sisters. And if you are reading this and nodding along I have an idea that may help you a lot….

Ladies I present to you the idea of setting up a Ramadan Cookery Circle.

For this idea to work you will need a group of ladies in a similar position to you.

How this works:

Basically you come together with a group of ladies and cook a few recipes in bulk. You then swap portions of the food with others in the circle for food they’ve cooked. And voila; you have instantly increased the amount of food you have for your Ramadan freezer.

Sounds pretty easy doesn’t it? I’ll still talk you through it.

STEP 1:
Gather your friends that will be having the same issue as you during Ramadan together.

STEP 2:
List all the food that you guys know you will be cooking in Ramadan. These foods need to be suitable for freezing.

STEP 3:
List all special dietary requirements including how hot people like spicy foods!
Share recipes (if required) with the group.

STEP 4:
Delegate the recipes out to the group. Agree on how much of each recipe needs to be made.

STEP 5:
Decide when you want the food to be cooked by and where and how the food will be delegated. Will you guys meet up a few days before Ramadan to swap food?

STEP 6:
Take the food home and freeze.

Now that doesn’t seem to be that scary does it?

The idea behind this is you save time by bulk cooking your delegated recipes and then you swap some with the others.

So if there’s 5 of you and you each of you cooked 2 recipes in bulk you are walking away with 10 dishes for your freezer (including what you cook yourself).

Don’t you think that’s awesome?

And the more of you there is there’s potential for less work and more dishes.

In my experience the following are awesome for freezing:

Samosas and rolls
Burrito rolls (great for Breakfasts)
Kebabs/Koftas
Pulaw and Biryani bases
Chutneys
Curry sauces
Meatballs (so pasta sauces, koftas etc).

What else should consider?

How much freezer space you have.
How much time will you need to prepare and cook your dishes in bulk.
Is everyone happy with their delegated dishes.
Do you want to swap dishes or do you want to pay for the ingriedents instead?

The idea of the circle is to cut your time in the kitchen and essentially share cookery skills and invest more time into Ramadan doing things that will be fulfilling.

With Ramadan on it’s way why not share this post with your ladies and see whose willing to sign up to your circle?

Got any advice for other sisters? Drop it below.

Cumin and Onion Rice aka Simple Pulaw (Pulao)

Sometimes I crave a simple warm homely rice dish but don’t want a heavy protein meal. And the desi in my needs a bit of heat…once in a while. And if I am to let carbs past my lips the food best be worth it….and this dish is worth it.

This rice dish is awesome with pretty much any curry and I love it with tarka daal, coriander and lemon potato curry..everything.

It’s a simple straight forward dish…and doesn’t call for millions of new ingredients.

To serve 4 (or six…) you’ll need:

Ingredients:
250 grams of basmati rice (once you weigh out the rice you’ll need to work out their measurement in volume. Place the rice in a glass and write it down. You then double that amount to work out how much liquid you need to cook the rice. So I and a half glasses of uncooked rice will require 3 glasses of water to cook using the method I used below).

3 tbsp oil (I use rapeseed oil)
2 large onions sliced thinly
1 TBSP salt
1.5 tbsp cumin seeds
1 heaped tbsp garam masala
1 heaped tbsp crushed coriander seed powder
Stock or water to cook the rice (to keep the dish veggie friendly just use water or vegetable stock)
1 dried red chili
1 piece of cassia bark
3 medium green chilies-pricked with a folk to avoid them exploding (optional)

1) wash the rice and set aside. Yes we desi folk wash our rice before we cook it.
2) Take a large pot and heat it up over a medium heat. Add the oil.
3) Add the sliced onion and fry until golden brown (not dark brown and don’t burn the onions you’ll be able to taste it!).
4) Add the cumin seeds, chili and cassia bark (and green chilies if using) and fry for 2 minutes (you’ll be able to smell the cumin).
NOTE: if you find the onions are becoming ‘sticky’ or clumpy add 2 tbsp of water.
5) Add the salt, garam masala, crushed coriander.Fry for a further two minutes. Decrease the heat if you feel the mixture may burn.
6) Now add the rice. Stir to coat in the onion mixture. Add the stock or water (you need to sum earlier to figure out how much you needed).
7) Bring the rice to the boil. Then reduce the heat. The rice will need around 12-18 minutes to cook. Stir occasionally to stop the rice from sticking to the bottom. Alternatively if you do have access to one use a flame diffuser to help reduce the chances of rice sticking to the bottom of the pan.
Tip: I use a pan with a glass lid so I can keep an eye on it. That way if I see the water evaporating I can stir the rice and reduce heat further if required.
8) Once the rice is done (I usually take a few strands and taste them….) turn the heat off. To avoid over cooking the rice remove the lid.
9) Serve!

To serve this dish as is you can add a dollop of yogurt or a simple raita. Job done!