No this is not an April Fools joke. Recently we had THREE cakes to mark the youngest child’s 6th Birthday and when you have that much cake sometimes you have leftovers. And when you have leftovers they can be somewhat drying.
When we think leftover cakes we think Cakepops. But this time I wanted to make something less laborous (we all know I like shortcuts).
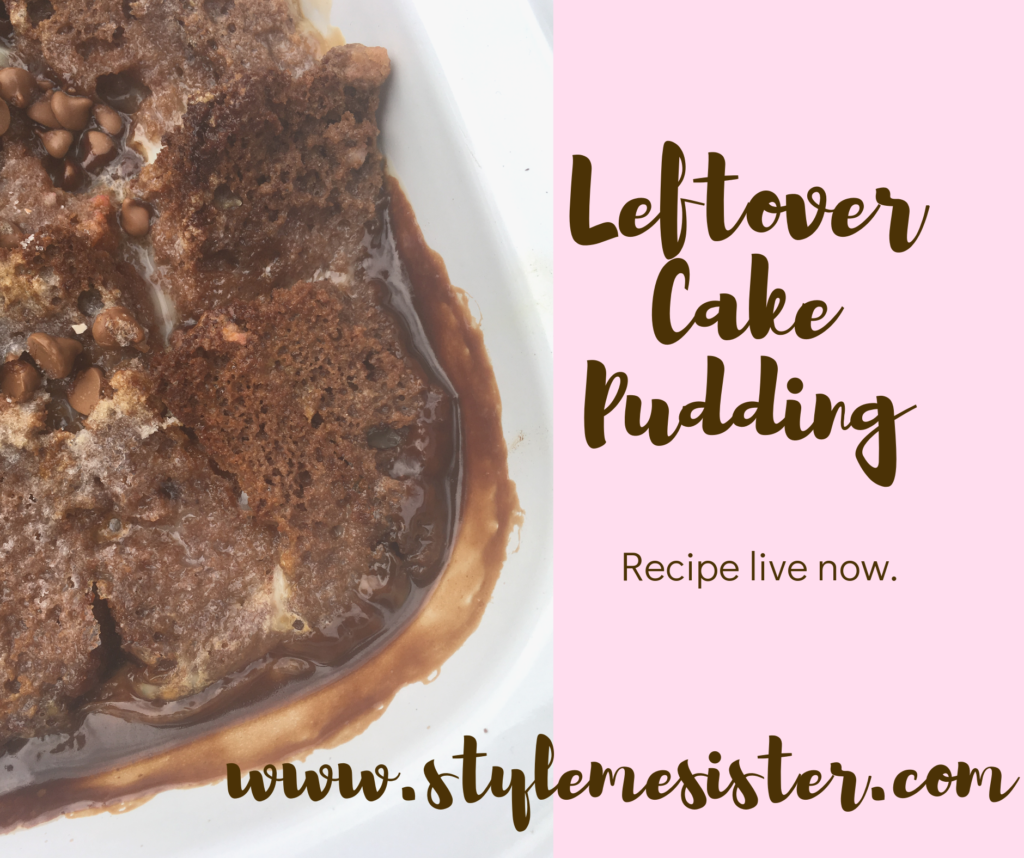
So after a bit of experimenting I opted for this….Cake Pudding…like Bread and Butter Pudding but with leftover cake.
This is amazing. I know I’m biased but it really is amazing!
To make enough Pudding to serve 4 you will need:
1/2 a double layered 20 CM cake. Ours was Chocolate flavoured and was ‘filled’ with Caramel flavour frosting.
500 ml milk
2 eggs
50 grams castor sugar (plus an extra TBSP for sprinkling).
100 grams chocolate chips
Optional: a tub of Caramel or Chocolate Frosting (we didn’t add any extra as the cake already had a layer in it OR about 3 heaped TBSP of Nutella or other chocolate based spread.
1) Remove the icing/frosting off the cake. Slice the cake up. Generally the thinner the slices the better. Just don’t make them too thin or they’ll fall apart.
2) If you wish to use the optional ingriedent of Nutella/Caramel spread it on half the slices. Then make ‘sandwiches’. So one slice of nutella’d cake with 1 slice of non-nutella cake.
3) Place the cake in an ovenproof dish (I used an old fashioned rectangular tin). I placed them so the point of the rectangle was at the top (and would be a bit crispy when I sprinkled on the sugar).
4) Whisk together the eggs, milk and sugar. Pour over the cake slices.
5) Sprinkle on the chocolate chips.
6) Place in the oven at 170C/Gas Mark 4 for 35-40 minutes.
7) Remove from the oven and serve with cream…ice-cream or whatever takes your fancy.
Alternative: if you wish to make a ‘chocolate’ custard mixture you could add the nutella to the milk mixture and whisk it in. Or if you want even more chocolate you could still apply nutella to the cake and also make the chocolate ‘custard’ mixture too.
I’ve always naturally leaned towards vegetarian food. Perhaps the fact I love lentils a tad bit too much for a lot of people’s liking is the reason I love a good vegetarian curry.
I love a good curry. None of this paste/out of a pack business (I’m Asian so….) it’s from fresh and needs to be cooked to perfection.
Since I was a child Tarka Daal has been my comfort food. Over the years I tried pimping it up however I always resort back to the basic, original homely edition.
My plate of daal usually contains more daal than rice (I’ve reduced carbs in my daily diet) plus pickles and freshly sliced red onions dressed in lemon. And that’s it. No fancy garam masala. No fancy business. It’s good old fashioned food like my late Nana and Grandmother would have made.
This daal cooks super quickly. If I pre-soak the lentils it takes 15-20 minutes. If I don’t it takes about 25 minutes. If I know I’m making daal I do tend to soak them before hand. Its not essential. Whilst the daal is cooking I tend to cook the rice (basmati folks; rules are rules in my house).
So what is Tarka Daal. Well Tarka just means tempering. In this case we use oil, garli and chilies. For some other recipes you may find mustard seeds, curry leaves, ginger, tomatoes and other wonderful ingredients too. But this is a simple, filling and amazing recipe that literally is a few ingredients.
Daal is the hindi/urdu for lentils.
It’s really that simple….the recipe is Tempered Split Red Lentils.
Tarka daal freezes well and if you really are one of those people that like to cook once a week you could freeze portions of daal with rice to have a ready meal on hand.
There’s method to my madness (How I calculate the volume of liquid for my daal)
I ‘measure’ by volume (e.g. place the lentils in a glass) and then double the amount of liquid. It’s that simple. So if I cook say one large mug of lentils I add 2 large mugs of water. And this gives me a thick daal. I do like thick daals and also eat it like a soup (minus the rice). Low in carb, highly filling and so good. I find the fragrance warm and earthy so I feel you could easily take a mug of this to work and ‘not offend’ the less adventurous people.
If you do decide to consume the daal as a soup consider a good squeeze of lemon as a garnish.
To make 4 big bowls of Tarka Daal you will need:
1 glass red lentils (approximately 250 grams) washed
2 glasses water (approximately 500-550 ml)
Cooking salt-to your on taste
1 level TBSP Chili Powder
1 TSP Turmeric (haldi)-for a more earthy taste use more. For a less earthy taste reduce the amount. I love the golden colour it gives and Turmeric is a wonder spice.
OPTIONAL: 1-2 dried red chilies (I like a hot daal)
3 TSBP oil (I’ve successfully used Rapeseed oil, sunflower oil, vegetable oil and olive oil).
4 cloves of garlic sliced thinly (I would use more but if I am going to serve the daal to someone I generally have a rule of 1 clove to 1 bowl. But if you love garlic and are eating alone you can go up to 6 cloves for the recipe).
3 green chilies slit (or prick them well all over so they don’t explode
1) Wash the lentils until the water runs clear. You can use the water to water your plants.
2) Place the lentils in a large pot and add the salt and spices followed by the water.
3) Place on a medium heat and bring to the boil. I usually leave a wooden spoon in my pot as I believe it stops the pan from boiling over. Once the lentils come up to the boil reduce the heat and remove the foam that you can now see floating on top of the lentils. You don’t want that to be a part of the lentils.
4) Add the coriander, stir and simmer. I stir a few times throughout simmering and find it takes about 15 minutes post boil for lentils to become tender. Now if you are happy with the consistency turn the heat off. If you want it more runnier add a bit more boiling water (you don’t want to bring down the lentils tempreture). If you want it a bit more thicker leave the heat on and allow it to simmer a bit more.
5) Heat the oil in a frying pan on a medium heat. Add the garlic and chilies and reduce the heat to avoid burning anything. Stir well (and turn the chilies over). You only want the garlic to be golden NOT burnt so once the garlic is turning golden kill the heat.
6) Pour the tempering over the lentils. Job done.
7) Serve the daal as is, or with rice, roti….or however takes your fancy.
Enjoy.
Additional notes:
you can ‘flavour’ the daal with vegetable stock if you wish to serve it as a soup.
Tarka Daal can be frozen….why not freeze up portions with rice for a quick freezer meal?
Green Lentil Spaghetti Bolognese with hidden vegetables
I have to admit that when I find/create a recipe I love and the family are happy to have seconds of I not only write it down but I schedule to blog it so it’s out in the blog world forever.
I first came across green lentils when I was looking at a robust lentil to add to my salads. As a daal fan I thought I knew most lentils. Turns out I didn’t.
I am making 2019 a year of big changes and adding more non-meat protein meals to our monthly planners is a big deal for me. The reduction in fat in my humble opinion is vital for my children’s future. They need to understand healthy can meat yummy food.
My preferred method of cooking is a two step process.
Starting the meal off on the stove.
Transferring it to a Slow Cooker.
Green lentils are small, earthy bursts of flavour that make a great alternative to meat because they pack a punch in the flavour department.
This recipe is economical and is started off on the stove and transferred to the Slow Cooker. But it can be cooked completely on the stove. However I love the carefree nature of my Slow Cooker.
My youngest ate bowls of this sauce without pasta; that’s how much she loved it.
So the actual recipe (serves 6).
NOTES:
Herbs used are dried.
Keep an eye on liquid levels especially if you are cooking on the stove. I like a semi wet sauce so some clings to the pasta and there isn’t much on the plate. You can adjust the stock/water amounts to make the sauce fit your needs.
250 grams green lentils (I bought mine in Tesco-they have the best range ever).
1 carton passata
225 ml water (or stock of your choice. Note that stock cubes contain salt so you need to adjust accordingly)
2.5-3 TBSP rapeseed oil
2 medium onions-diced
6 gloves of garlic-crushed
3 medium carrots-peeled and grated (coarsely)
2 red bell peppers-cored and grated (coarsely)
Handful of mushrooms-chopped finely
1 tsp oregano
1 tsp basil
1 tsp thyme
Salt-to taste
Freshly ground black pepper
Optional: chili flakes
To serve:
Pasta
Vegetarian Italian style hard cheese
Garlic Bread
1) Wash the lentils. Soak them in boiling water for a minimum of 1 hour. I placed them in a bowl and cling filmed it. It worked a treat. You could also place the lentils in a thermos and it would have the same affect.
2) Heat the oil in a large pan on a medium heat. Add the onions, black pepper, chili (if using) and herbs. Fry until softened. Add the garlic and fry for 20-30 seconds.
3) Add the carrots and peppers. Fry for 3 minutes. If the mixture starts to stick add a TBSP of stock or water.
4) Add the mushrooms and fry for a further minute.
5) Drain the lentils and add to the pan. Fry for a couple of minutes (I fried them for about 3 minutes).
6) Add the passata and stir well. Add the water (or stock). Lower the heat.
7) Taste the salt levels and add more if required.
8) Now transfer the mixture to your Slow Cooker and cook for 3.5 hours on High. I generally check the sauce and stir after 1.5 hours. I also add more stock if I want a more ‘sauce’.
9) If you are continuing to cook on the stove lower the heat and simmer until the lentils are tender. This can take a while. I would check regularly and stir well and keep an eye on liquid levels as you will need to add more as the amount I have added is more suited to evaporation during Slow Cooking.
10) Once cooked serve.
This dish freezes well.
You can add this to a Pasta Bake, Jacket potatoes or add a bit more stock and serve as a soup.
You could add olives and sun dried tomatoes for an extra hit of flavour.
I admit that this is more of an instructional tutorial than recipe however if I’m completely honest with you on nights where you are more likely to reach for a fattening takeout or ready meal cheats like this are awesome.
By no means am I saying feed your family this every night however let’s be honest here. Sometimes we need a meal we can prepare whilst juggling a clingy baby, a toddler crying over toys that have somehow ended up down the toilet and a boss that wants to know when you think you’ll be returning to work FULL time.
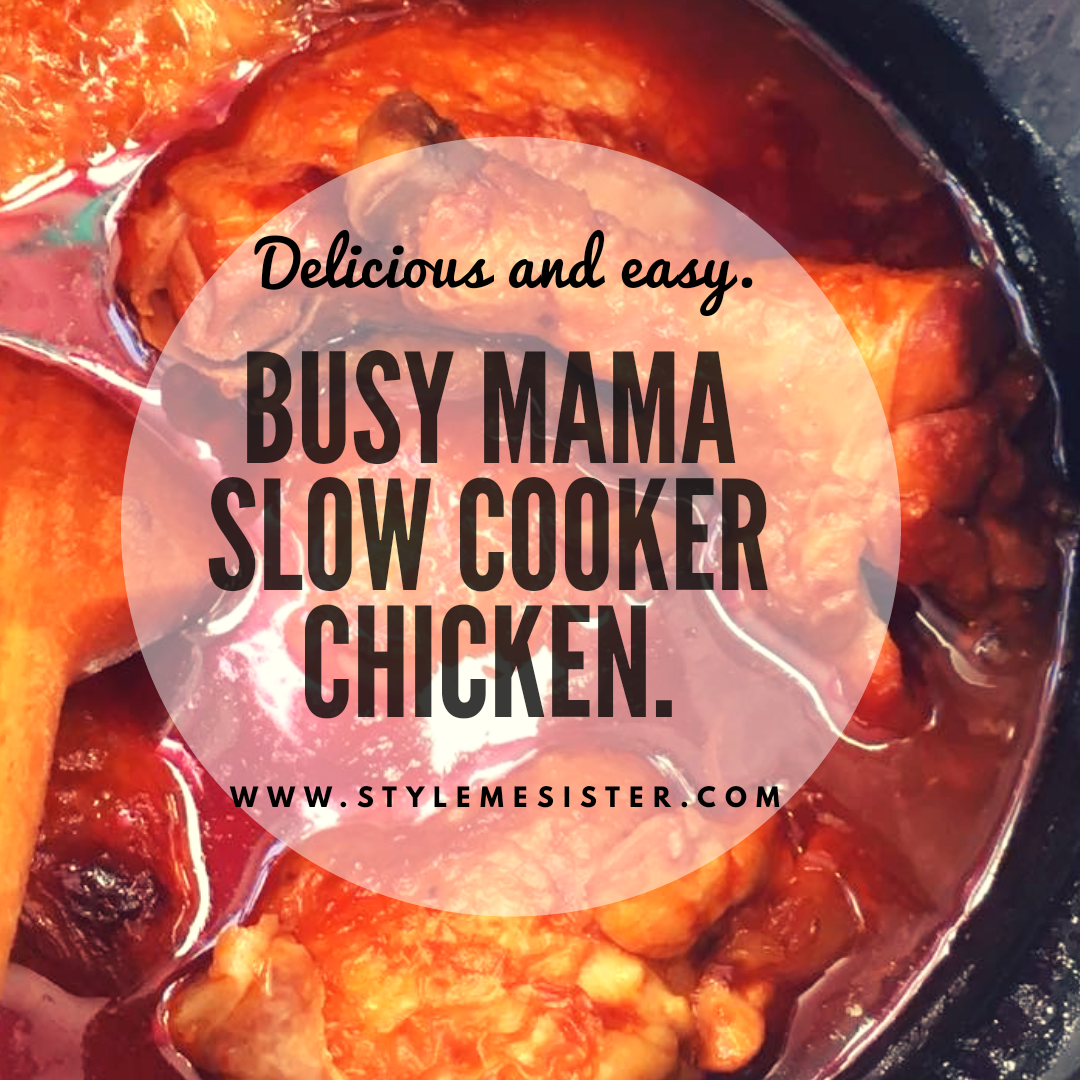
My children love this recipe (as do I). The only effort in this recipe is the actual browning of the chicken.
Once I’ve browned the chicken it’s pretty much throw stuff into the slow cooker and forget about it until you need to prepare the rice to serve with it (I served the chicken with basmati rice).
Did I mention this meal works out at less than £0.75 per head?
So to put together this super easy meal (that serves 4/6) you will need:
6 pieces of chicken (I purchased three legs, skin on cut in half)
1 tablespoon oil
For the sauce:
60 ml dark soya sauce
3 tablespoons honey
80 ml tomato ketchup (for an extra kick you can use flavoured ketchups)
8 cloves of garlic-crushed
Juice of 2 limes
Optional: salt to your taste (remember that soya sauce is very very salty!)
Optional: 1 teaspoon chili flakes (for some heat!) OR 1 tablespoon chili sauce
To serve:
I served mine with rice. If you are on a low carb diet replace with cauliflower rice.
1) Heat the oil on a medium heat in a large pan. I use a non stick large frying pan.
2) Add the chicken pieces and fry for 5 minutes per side (I find this browns and crisps the chicken nicely. Always check your chicken whilst cooking it to avoid burning it).
3) Once the chicken is browned drain on some kitchen paper and set aside.
4) Now make the sauce. Pour the dark soya sauce, honey, ketchup, garlic, lime juice and optional ingredients (if using) into your slow cooker and stir to mix. You could use a whisk if that’s more convienent.
5) Add the chicken to the sauce. Spoon some of the sauce over the chicken. Cook on slow for 5 hours. If you are cooking on the high setting check your chicken after 2.5 hours. Remember that chicken on the bone cooks slower than boneless.
6) Check your chicken at half way and baste it with the sauce (your chicken is highly unlikely to dry out but we want maximum flavour).
7) Your chicken is ready to serve.
Notes: if you do wish to add salt please do so towards the end of the cooking process after tasting salt content. I find it easier to add salt that take it out if you over salt a dish.
Leftovers make great lunches the next day.
Or you can shred the chicken and make sliders (sandwiches).
I cannot be the only one that looks for ways to add the magic of Ramadan and Eid to the lives of those around us. I also cannot be the only Mama who looks for ways for her children to share this blessed and magical time with their friends and Teachers either.
As my girls get older they are noticing more and more that a lot of attention is given on a global scale to Christmas. They also notice that gift giving/baked goods and other little items are distributed a lot during the festive period.
So this year I put a bit of effort into my children’s light Dawah on the playground. That’s right; I classed this project as Dawah. Because even though there isn’t any spoken words to this we are paving the way for conversation. And we are also spreading kindness. Dawah in my book doesn’t have to be about preaching. It’s also about creating opportunities to discuss things.
So why am I posting this recipe so close to Christmas? Well I don’t see any reason why you cannot distribute these cones for Christmas too.
So to make 12 cones of pure yumminess (that took me about an hour and a half to actually do) you will need:
Ingredients:
500 grams popping corn (plan stuff available in most supermarkets and is actually quite cheap)
4 TBSP oil (sunflower works-no need to go fancy)
For the caramel:
600 grams sugar (I used a mixture of what I had in the house-which was soft light and dark brown sugars)
550 grams of butter (feel free to use salted)
Sea salt (crushed) to taste.
4 TBSP honey
4 TBSP double cream
To wrap up:
12 x cellophane cone bags (I purchased these in a set of 50 as I have other projects coming up)
12 x wire twists to fasten the cones
Stickers (optional-we bought Eid Mubarak stickers off eBay. I’ll be using personalised ones for the Christmas cones we are distributing too).
Equipment:
2 large baking sheets (or 3 smaller ones). Line with greaseproof paper. I prefer to use the sheets that are used to make tray bakes etc as they have high sides which prevents popcorn falling off.
1) You need to start by popping the corn. I popped the corn in batches. I placed 2 TBSP of oil in a large pan and heated in a large pan and add 150 grams of corn. Give it a quick shake and place the lid on. Now is the fun part. You need to listen to the corn pop. This takes around 5/6 minutes. Give the pan a shake (carefully as it will be hot!) during the 5/6 minutes to stop the popcorn burning. Once the speed of the corn literally dies down (again around 5/6 minutes in). Turn the heat off. Give the pan a shake. Do not remove the lid just yet in case you get hit by a stray popped corn.
2) Repeat step 1 until all the popcorn is popped. Remove any cernals that haven’t popped (chipped teeth are not in vogue). Place the popcorn to one side. Now make the caramel.
3) As there’s a lot of popcorn I make the caramel in TWO batches. I find this the best way to control the situation.
Heat half the butter and half the sugar in a medium pan. Stir the mixture to prevent it burning.
Cook over a medium heat until the caramel is formed. Now by this I mean you’ll literally see a sticky, brown liquid lava in the pan. Now add 2 TBSP of honey and stir in. Reduce the heat to prevent burning. Now add the double cream and stir until combined. Allow to bubble for a minute. Turn the heat off. Allow to cool for a few minutes. It will still be hot and you need to be careful not to scald yourself as hot sugar is dangerous.
4) Now comes the messy yet slightly dangerous part. You need to add half the popcorn to the caramel. Stir well to cover as much of the popcorn as possible. Now divide up the mixture onto the trays and spread evenly. Sprinkle on salt to your taste.
5) Bake in an oven at 170 for 15 minutes. Turn the oven off and allow to cool completely. Don’t worry if you peak at the popcorn whilst it’s warm and the mixture looks like it’s melted. Once its stone cold it’s set and will be yum. Hold the vision; trust the process. Always.
Now repeat the above steps to make another batch of caramel/caramel popcorn.
Once the popcorn is cold you may wish to break up the clusters to bag them up. That’s fine. Place in the bags and fasten. Add labels/stickers as you wish.
Any leftover popcorn will keep well for up to 4 days in a ziplock bag/airtight container.
Distribute with pride.
Enjoy.
Note: this popcorn is high in calories and sugar. In case you were wondering.