As a child Parathas (Indian style flatbread containing butter-we’re Punjabi) and a fried egg signaled the beginning of the Weekend. But boy did they take time to make. I mean you kneaded the flour, allowed it to rest, rolled out the perfect Paratha then cooked it (but not be overly oily because no one likes greasy fingers right).
And of course the egg would be simply fried with a bit of salt and pepper.
Oh how times have changed. My Mother was a full time stay at home parent until I was a teenager. However I am not. My children don’t have the access to a parent that spends hours in the kitchen creating food of their childhood.
Frozen food has come a long way. A looooong way.
I have a huge well stocked freezer….and one of my favourites (and essentials) is Frozen parathas.
Yes that’s correct. FROZEN PARATHAS.
For real. Companies have upped their game since I was a kid.
Frozen Parathas can be off putting for a lot of people to use (My Mother dislikes them..) however if you follow the directions they are super easy to use.
Firstly these guys are used FROZEN.
No defrosting.
You heat a flat pan (I do own a tava) on a medium heat and place the Paratha on the pan.
You don’t need to add any extra fat guys!
You then literally leave it on the pan for 2 minutes and turn over (with a tongue-I love my wooden tongues and my trusty all rounder ones) and fry on the other side.
You fry until the bread is lightly browned.
I then place it on a piece of kitchen paper and try and remove as much extra fat as possible.
I then serve them.
My children love Paratha rolls. I almost use the Paratha like a tortilla wrap. Its a happy desi medium.
Parathas are awesome for Bihari Kebab rolls, Bombay Frankies, Pakora Wraps….these babies are awesome.
I pick up a pack of 5 plan Parathas for £1.29. You can also get Alu (Potato) Parathas, Gobi (Cauliflower), and Methi (Fenugreek) and a range of other flavours too. There’s also Lache (multi layered) Punjabi Parathas you can try.
Now these are not the healthiest item in the world. But they are awesome for weekend breakfasts.
Most important question is though: how do you take your eggs and Desi tea with your Paratha?
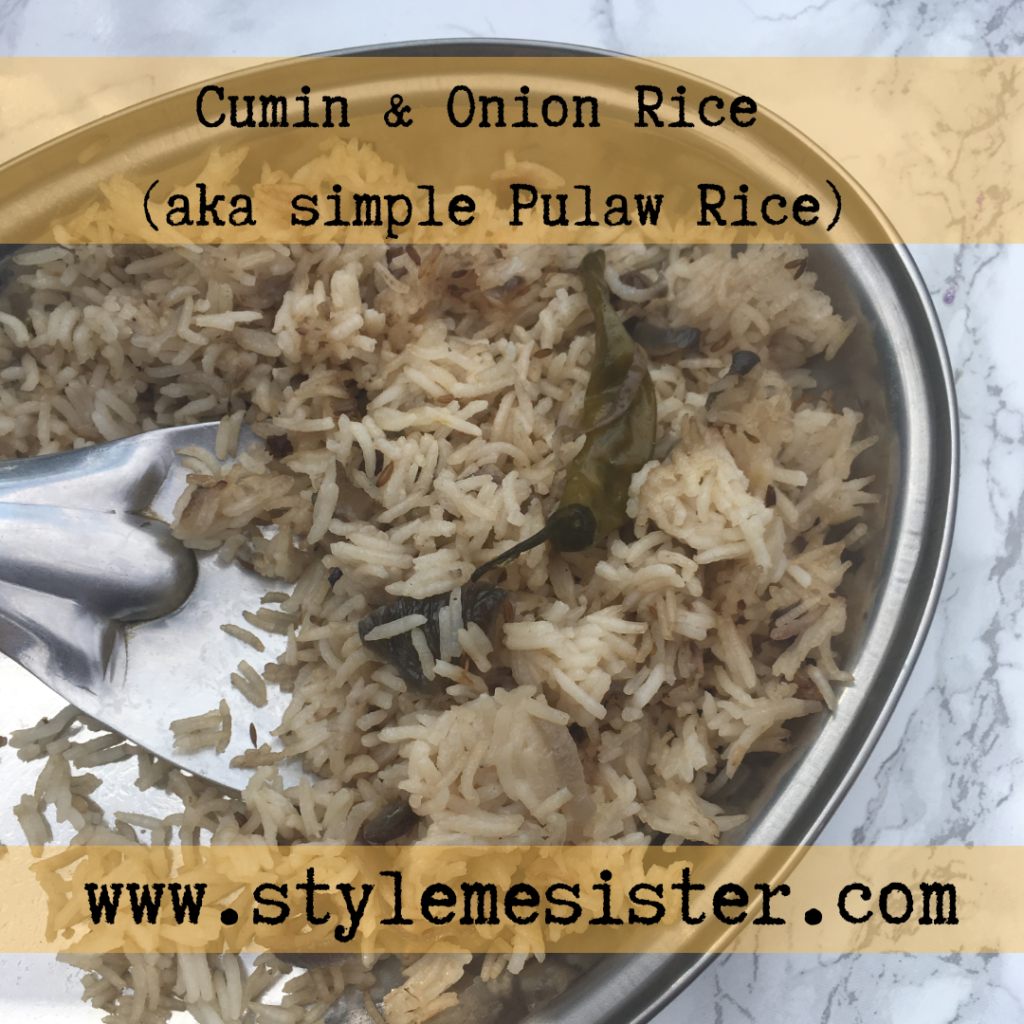
Sometimes I crave a simple warm homely rice dish but don’t want a heavy protein meal. And the desi in my needs a bit of heat…once in a while. And if I am to let carbs past my lips the food best be worth it….and this dish is worth it.
This rice dish is awesome with pretty much any curry and I love it with tarka daal, coriander and lemon potato curry..everything.
It’s a simple straight forward dish…and doesn’t call for millions of new ingredients.
To serve 4 (or six…) you’ll need:
Ingredients:
250 grams of basmati rice (once you weigh out the rice you’ll need to work out their measurement in volume. Place the rice in a glass and write it down. You then double that amount to work out how much liquid you need to cook the rice. So I and a half glasses of uncooked rice will require 3 glasses of water to cook using the method I used below).
3 tbsp oil (I use rapeseed oil)
2 large onions sliced thinly
1 TBSP salt
1.5 tbsp cumin seeds
1 heaped tbsp garam masala
1 heaped tbsp crushed coriander seed powder
Stock or water to cook the rice (to keep the dish veggie friendly just use water or vegetable stock)
1 dried red chili
1 piece of cassia bark
3 medium green chilies-pricked with a folk to avoid them exploding (optional)
1) wash the rice and set aside. Yes we desi folk wash our rice before we cook it.
2) Take a large pot and heat it up over a medium heat. Add the oil.
3) Add the sliced onion and fry until golden brown (not dark brown and don’t burn the onions you’ll be able to taste it!).
4) Add the cumin seeds, chili and cassia bark (and green chilies if using) and fry for 2 minutes (you’ll be able to smell the cumin).
NOTE: if you find the onions are becoming ‘sticky’ or clumpy add 2 tbsp of water.
5) Add the salt, garam masala, crushed coriander.Fry for a further two minutes. Decrease the heat if you feel the mixture may burn.
6) Now add the rice. Stir to coat in the onion mixture. Add the stock or water (you need to sum earlier to figure out how much you needed).
7) Bring the rice to the boil. Then reduce the heat. The rice will need around 12-18 minutes to cook. Stir occasionally to stop the rice from sticking to the bottom. Alternatively if you do have access to one use a flame diffuser to help reduce the chances of rice sticking to the bottom of the pan.
Tip: I use a pan with a glass lid so I can keep an eye on it. That way if I see the water evaporating I can stir the rice and reduce heat further if required.
8) Once the rice is done (I usually take a few strands and taste them….) turn the heat off. To avoid over cooking the rice remove the lid.
9) Serve!
To serve this dish as is you can add a dollop of yogurt or a simple raita. Job done!
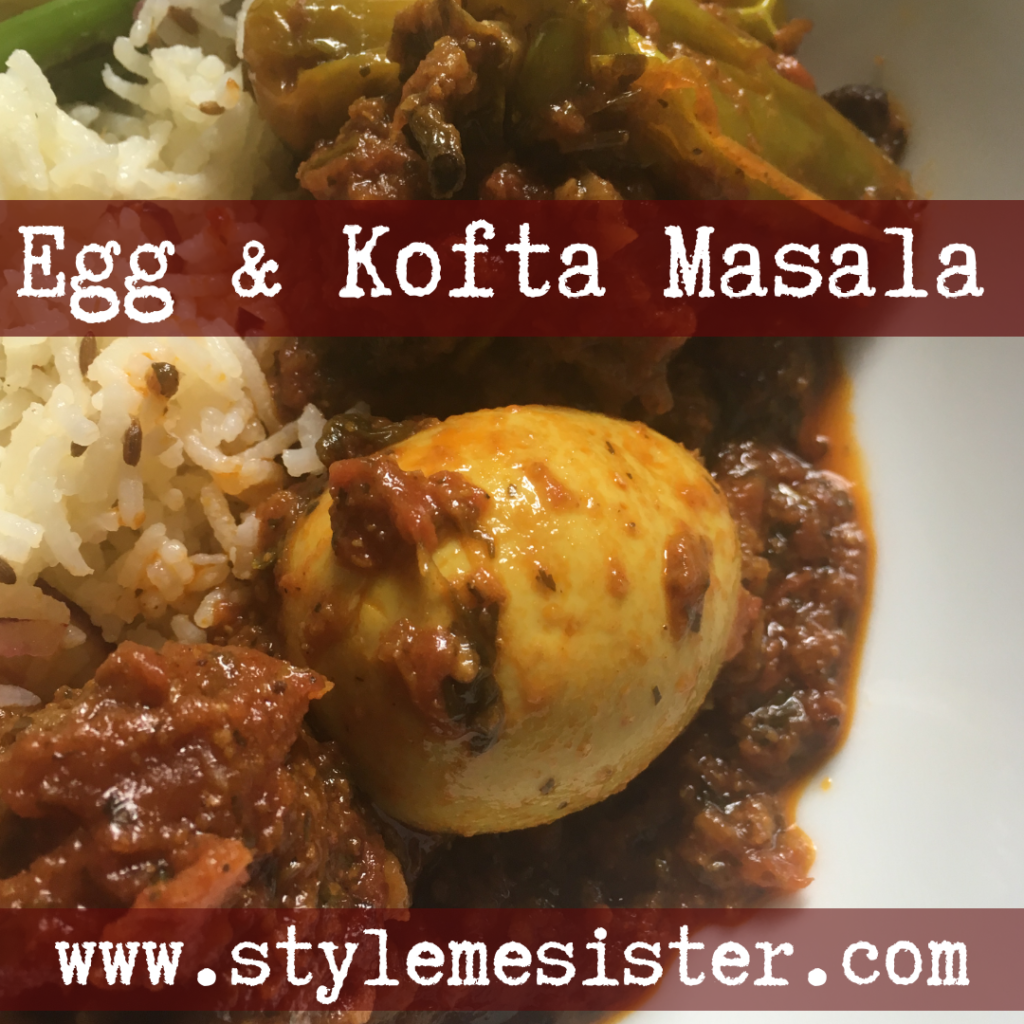
I have a confession to make; I love Nargasi koftas but I seriously cannot stand the hours needed to create these egg filled delights and cook them. Most probably because I’m usually cooking around other tasks and don’t have hours on end to commit to cooking one dish.
So my compromise is this dish: Kofta and Egg Masala. It contains koftas and eggs and it doesn’t take all day to cook and it tastes awesome. There isn’t much ‘sauce’ (curry/gravy-whatever you choose to call it) so it’s not a wet curry. I just thought I would mention that.
I’ve actually broken this recipe down so that if you cannot actually cook it all in one go you can break up the workload over 2 days. If you wish to cook it in one go just work your ways through the steps.
As I utilise the use of my oven I can place the dish in there to cook and get on with other tasks.
I actually serve this rich dish on Eid; it’s that good.
Serves 4/6
Ingredients:
500 grams minced lamb/mutton
1 slice of bread (whizzed up in a food processor)
Salt-to your taste
1 tsp red chili powder
1 tbsp coriander powder
1 tbsp cumin powder
1 tbsp coriander seed leaves chopped finely
1 green chili chopped finely (optional)
1 small onion finely chopped
To fry the koftas: 1 tbsp oil
Non-stick frying pan
For the masala:
1 400 gram tin of tomatoes (pureed/liquid in a food processor)
1 medium onion finely chopped
4 cloves of garlic crushed
1x 1 inch piece of ginger (Whole-remove before serving)
1 large cassia bark stick (can be removed before serving-it’s not edible in case you were wondering)
2 tbsp coriander leaves finely chopped
2 tbsp rapeseed oil (or other oil to your liking)
Salt-to your taste
1 tsp red chili powder
1 tbsp garam masala
1 tbsp coriander seed powder
1 tbsp cumin powder
3 bullet chilies sliced in half
6 hard boiled eggs-peeled (you’ll need to cut a small slit into each egg to prevent them from possibly exploding in the oven. Chances are slim but I despise cleaning the oven!).
To serve: lemon wedges & naans (I also serve this with Pulao rice or Jeera Rice).
1) Take the mince out of the bag. Do not wash it. That will create a big mess so please ask your butcher to just wash the meat before they mince it. Add all the ingredients listed for the koftas. Now mix until the ingredients are evenly distributed. I find the easiest way to do this is by hand. Yes your hands will get messy but your hands really are the best tool for the job.
Now comes the fun part: shape your meatballs (koftas). I take about a walnut size piece (a heaped tablespoon even) and squish the mixture together as tight as possible. Place on a plate/tray. Shape all the koftas. You can either place the shaped meatballs in the fridge for 30 minutes to 3 hours and then move onto step 2 or just move onto step 2. Seriously. I rarely chill the koftas I never have the time.
2) Heat one tbsp of oil in a medium sized non stick frying pan. Now fry your koftas to basically seal them and give them a bit of colour. Do not keep turning them over; they will break. Instead check them by gently lifting one after 3/4 minutes and if they are golden turn them over. Seal on the other side. This step takes around 15 minutes.
3) Once the koftas are brown take them out of the pan and place them on kitchen paper to drain off any excess oil. I usually give the koftas a pat all over with kitchen paper and I don’t like lots of grease. That’s optional.
IF YOU ARE PREPARING THIS DISH STEP BY STEP: once the koftas have cooled down place them in a ziplock food bag or a freezer proof container with lid. Place in the freezer and use within a month.
4) Once you’ve got the koftas done you’ve actually got the hardest bit done. To make the masala heat the two tbsp oil in an oven proof cooking dish on a medium heat. Add the onion and fry until lightly brown. Add the ginger and garlic and fry for 2 minutes or until the garlic is lightly brown. Now add the salt, cassia, powdered spices and stir. If you find the mixture is sticking to the pan feel free to add a tbsp of water. Repeat if required. Fry for 3/4 minutes. At this stage you are cooking out the spices.
4) Now add the tomato liquid/puree. Stir well. Now add the sliced chilies (if using) and half the chopped coriander leaves. Cook on a gentle heat until you start the see puddles of oil literally separating from the tomato mixture. This indicates your masala is done. Yay!
5) IF YOU ARE PREPARING THIS DISH STEP BY STEP: You can turn off the heat once the masala is done. Cool it down and place the mixture in a ziplock food bag or freezer container and freeze the mixture for up to a month. Or if you wish you can make the masala up to two days in advance and cool it and place it in a suitable container in the fridge. Yes it really is that simple.
6) If you are cooking this recipe in one go: add 400 ml of water to the masala and turn the heat up and bring to the boil. The masala may look at bit watery. Don’t worry, this is normal. The texture improves in the oven. Turn the heat off.
IF YOU ARE PREPARING THIS DISH STEP BY STEP:
Defrost the koftas and masala overnight in the fridge. Alternatively defrost in a microwave and ensure both items are thoroughly defrosted before use. By preferred method is defrosting in the fridge.
To cook complete the dish using frozen products:
Place the masala in an oven proof dish. Spread it out evenly. Add 250 ml (approximately a glass) of water and place the dish in the oven at 180 for 15 minutes. Remove from the oven. Lower the oven temprature to 150. Proceed to step 7.
7) Add the Koftas to the masala. Stir to cover the koftas. Cover the pan before placing in the oven. If your dish doesn’t have a lid (or let’s face it you cannot locate it in your overloaded cabinets) cover loosely with a piece of foil-shiny side outwards). Now bake at 150 for 45 minutes.
8) After 45 minutes take the koftas out of the oven. Your koftas will be cooked at this point. Now add the eggs. Stir so they are covered in the masala. If the masala has evaporated you can add 3 tbsp of boiling water (be careful) to the mixture and stir well. This will give you a bit of sauce to work with. Cover the koftas and return the oven for 10 minutes.
9) Take the koftas back out of the oven…and your dish is ready to serve. Sprinkle on the remaining coriander. Serve with naans and a wedge of lemon. Enjoy.
NOTES:
This dish isn’t suitable for freezing unless you remove the eggs.
Do not refreeze the kofta masala if you are using frozen koftas or masala.
I find this dish also goes superbly with jeera and lemon rice.
Don’t get me wrong; you don’t need specialist equipment to cook a decent Curry or Pulao Rice at home however I’m Asian and we do things a certain way. So here are my gadgets and gizmos I use a lot of when I am cooking ‘desi food’.
1) Spice grinder aka a coffee grinder. I try my best to avoid pre grinded spice mixes as I love fresh spices. It’s as simple as that. So I try and buy my spices whole and grind down a months supply at a time. I know the old skool amongst you will say you need a mortal and pester…and that’s fine too however the grinder is faster. NOTE: I purchase pre-made (grinded) chili powder. For real the pain of making your own is crazy so please do not try it at home).
2) A tava (flatbread pan)
If you make parathas, rotis etc at home I recommend you invest in a good tava. I also use mine to make delicate kebabs (Shaami) on my tava.
3) Electric Rice Cooker
Yes I know my Nanny wouldn’t have had one of these knocking about in her kitchen however modern day cooking in the West is much more different to the homeland. I love my Rice Cooker as it’s awesome for cooking boiled rice, pulao and even biryani. My Rice Cooker has a saute function which makes it uber useful as my kitchen aid. I often freeze pulao masala. When I defrost it I can stick it in the cooker with rice and stock and voila! Perfect pulao.
4) Small frying pan (a one egg pan would be ideal)
I dry roast my spices before grinding them to get maximum taste out of the spices. I have a small pan I keep for just spice roasting. But if you are serious about your desi food you’ll understand my passion of maximum flavour.
5) Strainers
If you cook daal or rice you’ll need a strainer or three. I have fine mesh ones for lentils and rice.
6) Steel bowls (in different sizes)
Great for when you need to make dough and leave it to proof, or make up pakora batter etc.
7) Rolling pin (wooden thin one especially for making super cool rotis.
I purchased mine off eBay.
8) Tin opener
I use tinned Alfonso mango puree to make Lassi as well as using tinned tomatoes in curry bases. So a tin opener is an essential item to have on hand.
9) Wooden Tongues
Ever burnt your fingers turning over a paratha? Painful! So I use wooden tongues to turn over rotis etc.
10) Mortal and pester
Chutney made in one of these is out of this world. Enjoy said.
Other items that come in useful include:
ikea Garlic Press/crusher
Pressure King Pro (for the Pressure Cooker function which is useful for cooking pulses)
Chopping boards & sharp knives
A range of cooking spoons (separate ones for sweet and savoury)
Small frying pan for tempering
Bouquet garni muslin bags-I put the whole spices in them for making ‘yakni’ (meat stock)